hello this is randy with excel for freelancers
and welcome to the income tax manager no more tax headaches at the end of the year i'm going to
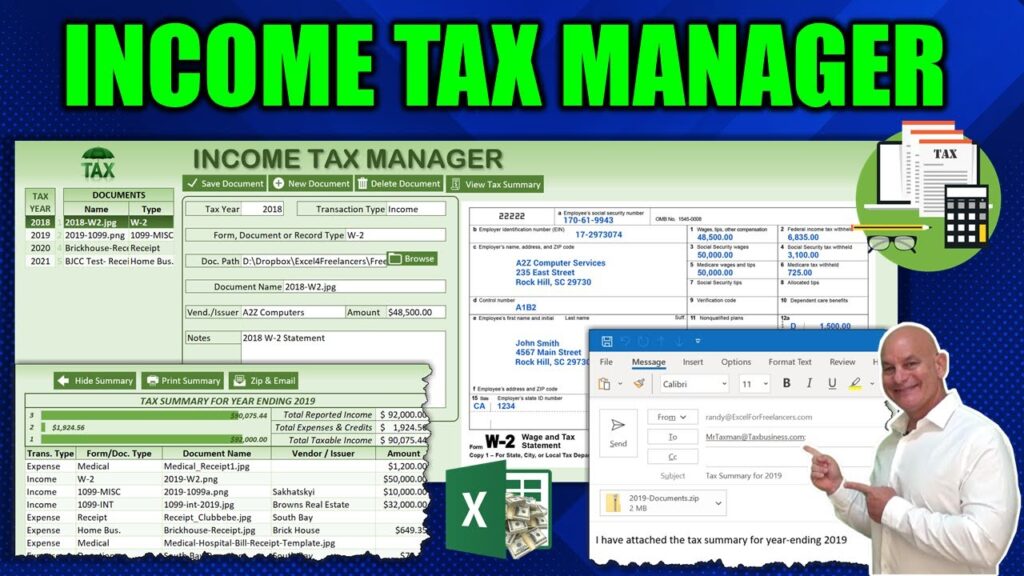
show you how to create this incredible tax manager unlimited document type uploads an automated
tax summary complete with zip and email function zipping all of your tax documents up in a single
one click it's gonna be an incredible training we're gonna do it from scratch every step of
the way i cannot wait so let's get started all right thanks so much for joining me i've
got a really great training this week taxes are always a headache i don't know about you but for
me they are getting all the documents together all the forms the records filling everything out
putting all those receipts in a single place this application is going to make it a lot easier
not only that i'm going to show you how to make it we're going to be able to upload any document type
we're going to be able to save it categorize it automatically create their own organized folders
on a per year basis so everything's going to be organized automatically by vba and of course
we're going to wrap it all up in just a single summary we can get a report and of course zip and
email that summary in just a single click to your account so we've got a lot to show you today i
want to get right to it i create these trainings for you each and every tuesday absolutely free if
you want this application of course that is free too all you need to do is click the links down
in the description and you get that either with your email or with your facebook messenger we're
going to get that sent over to you right away as mentioned it is free however if you do like to
support us and support this channel there are so many great ways to do that one is you can join
us on patreon because that way it gives you the opportunity on that platform to get whatever
feature you want added to this application maybe you want me to fix something up or maybe you want
me to focus on a section we do that inside patreon with a whole lot more along with free pdf code
books we have tons more when you sign up including brand new lessons way before everybody else does
days before everybody else does plus you'll get exclusive deals you're going to get tons more
including that so patreon is a great platform for you to join us on i hope you'll join us there
because that's where there's a lot going on and of course i'm answering questions and comments
there as well all right so let's get started on this training this is a sample we're going to be
putting this away and we're going to be starting from scratch so you got an idea of what we're
going to be building all right so let me move this aside here and we're going to start on this blank
sheet here this is our income tax so this is what we're going to be creating from scratch before
we do that just a little bit of an overview of what we're going to be creating we've got an admin
screen adding screens allow us to do a few things one we've got a folder if we're going to be
saving those documents in a specific folder and categorizing them we've got to know what folder to
save them in so we're going to create an exclusive folder called documents right and it is this
folder that we're going to browse for inside this so we'll browse for that and then what we're going
to do is we're going to put that folder right here we also want to know what kind of form types are
we creating we want to categorize our forms our documents or our record into particular categories
it's going to make it a lot easier so we have our income form types and i've got a list of different
income for types of course this is for generally for us but you can change it for any country and
then just a little description to remind you what it is for we've also got expense types this is
going to help us determine that profit and loss for your or your taxable income for the year
if we have expense types and of course we have other form types that don't have anything to do
with the income or the expense or write-offs and then we have a list of tax years so our admin
is relatively simple and then all we have is a database and that's going to track everything else
we've got a document id a tax year the transaction type that we just went over in the admin the
document form time a path right where is that document located what is the name of it who issued
the document the amount the notes and the row we're also going to use some data mapping here to
help us with that so let's go ahead and build out this screen first and then what we'll do is we'll
get into the code and i'll walk you through every single step so if you're new to coding this will
be a great training for you what i'm going to do is i'm going to drop this down so we can see both
the tabs and the commands here and of course i'm going to be using the newest excel for this one
as we'll be doing moving forward for the most part but i'll make sure to use any features that could
be used with any version of excel so i'm going to color those first two columns in gray those are
going to be for our admin and then what i'll do is i'll give it that top row just just all the
way up until let's go all the way across here just to a nice i think too az should be sufficient
now in this what i want to do is i want to give this a color so i'm going to format that cells and
what we'll do is we'll give it a little that green that you saw that green fill but it'll do a fill
effects and we'll do using two colors so i'm going to use the the green as you saw it's going to be
green through so i'm going to go with this mid green to this lighter green and then that's what
we're going to use for our top header and then the secondary line here what we'll do is i'll go again
all the way to let's just say a z one more time and then a little bit of more of a fade effect so
sorry it's off the screen formatting those cells once again using the fill effects and then this
time we're going to use that lighter to green and we're going to create our background color
which is our that light green so we're going to blend into that then what we'll do is we'll just
temporarily we'll color everything and then on down all the way down here to probably let's
just go with a z one more time and down here okay so we've got enough rows that we're going
to be covering that's going to be sufficient and i'll just give it that background green color
okay so we're sufficient we've got our background color here now what i'd like to do is i'd like to
have a tax year here and i'd like to have a title so let's insert that title as you saw so we'll
do is we'll insert right now we want to insert a shape so we're going to put inside this shape
here probably a type of text box so that's all we need and we'll call it illustrations and then
we just need a simple shape for text box here and then that's going to be our title we're going
to call this as you start income tax manager and then we'll go we'll format that a little
bit so we don't want to fill and we don't want to border on this so we'll remove the fill we
have no fill on that here and then we want no outline on that so no border on that and then what
we'll do is we'll give it a larger font probably something around 30 pixels and then we want to
change the font to something which is standard i'll often like arial round bold mt okay i like
that let's give it a little bit of the dark green color for theme and maybe we'll just do a little
bit of a shadow on that so it gives a nice effect on that so that's sufficient but that's too
much so i'm going to go into the shadow options and what i'm going to choose is it's going to
start out with this preset and then we'll just drop it down a little bit less than that so it
doesn't give it that just a little bit less so that's kind of a nice look okay that is sufficient
right there and what i'm going to do is just center that and then we'll add an icon at the
mall i'll add all my icons at the same time so what i'd like to have is an a year column as
you saw in the sample if you didn't no problem and then i want to have a documents column so our
year column probably going to start out we'll call it a tax year that's going to be in three and four
so what i'm going to do is i'm going to take this and i'm going to merge and center that and then
i'm going to give that also a fill format sorry it's off the screen formatting those cells
and then again i wanted to use the same fill formats here you again using that dark
green all the way to the lightest green okay that's going to be because then we've got two
different rows that we're going to compensate for and we're going to call this tax
year so this is going to be our tax year and then of course i want to wrap that text
around i want to give it a bold and then give it our dark green color so we it's according to our
theme and then i'll just wrap the borders around that so we're going to format of course we can
format in different ways the border color we're going to use again we'll use that dark theme all
the way around giving it so that's going to be our tax year there in three and four and what i
also want to do is let's increase this row here so we have enough and then bring this up here
so we've got enough for our both our button sets which are going to be below this and then our row
2.
So that's going to be sufficient for that and then what i want to do is i also want to create
some documents here so i'm going to do documents and then here i want the name of the document
and then i want the type of the document here and that's going to be sufficient that's going
to go into g okay so we've got the name and the type of document we're going to center everything
and then i want to put borders around here so i'm going to merge and center this here and then
what we'll do is we'll use the borders around everything those that same green consistent border
of course we can color that border here great we can give it a specific line color let's zoom up
on that so we can scroll up on that so we can give it that border that green that line color we'll go
with that standard green that we're going with and i just want to color basically all these borders
around here that's going to be sufficient and then of course we're going to go inside we want the
inside borders here so all the borders will color all right i like that there now what we'll do
is we'll format these cells and i want to give it that a little bit darker green color so i'm
going to do the fill effects here and give it that darker green look that we had there the little
fade there between these two colors there okay and then we'll do the same thing on the lower
one but just a little bit lighter here gives us that nice look that's going to give us the same
look as that merge cell on the left side which we want want to be consistent with the colors as
we build this application so that it gives a nice theme and a nice color so it's appealing so what
i'd like to do is here have all the tax years here have all the documents here and then as i click
the document i want those documents to appear here so down here the row here is where i want to
skip right have a spacer there and what i want to put is the tax year here the tax year here and
then that tax year is going to be here we've got some data validation here so then next up what i
want to do is i want to skip something and i want to have a transaction type that transaction what
is the type of that transaction is it income is it expense or is it other so i want to put that here
and then that actual transaction type is going to go directly inside n4 here so we're going to give
it those two just give it that white color so we can keep track and this is going to be emerged in
center merge center and then we'll move it to the right all right so that's what we're going to have
as far as our first row then what we want to have skipping one row i want to have the form
so put in a form or maybe the document or the record type or it could be different
type record type that's that named range that we saw here so inside that i want to put
the form type here whether it's receipt is it another form type or is it an income right
so it's either going to be an income form type like here an expense form type down here or
perhaps it's going to be an other so i've got three different named ranges and it's going to
be based on the form type that's selected here and that is going to go here so we're going to
use that on m and n6 so i'm going to merge the center that left justify it color that white
okay and then we'll get the formatting i'm going to skip another row so inside 8 i want to
have the document path what is the actual path of that document that's very important we're
going to need about browse for that so document path that's going to be a longer one so we'll put
a button here inside and so i'm going to color all this white i want that entire path all the way
from let's say j through m will cover that for us so merge and center left justify and color that
white just so we can keep track of it skipping a row again i want the the name of the document
document name here and i want that covered that's going to be all the way from k all the way
through ends because that's going to be larger that's going to be larger so we want to contain
it we want to make sure that we're having enough room for our preview document here so merge
and center that here and then left justified that's going to be our document name and
again we're going to do the same thing here merge and center that and then right justify we'll
do the borders after everything after that what do we want i want to know who's going to issue that
is there a vendor name or who issued it vendor or issue or do issuer okay so who issued that
and then also i want to have the amount i want to know what amount is that that's very important
obviously we need to know the amount so those are two things that we need to cover let's merge and
center this left justify it and then what we'll do is all left justify this and call those white okay
so we've got those next up all we have really left is some notes so i'm going to do notes here and
give the user the ability to added notes and we'll cover a lot of rows on that so maybe we'll go from
14 through 19 on that so let's go ahead and do something like that and then what will merge and
center this left and upper and then color that white okay i like the way that that looks that's
going to our form and i also want to put a border around there so let's add some borders here i'm
holding down the control what i'm going to do is i'm going to select all of these that we just
created we'll have to do some additional merging and centering and things like that especially for
some labels but we're almost finished with our on sheet form now i'm going to format those so
sorry it's off the screen now right click format cells border gonna go with that same dark
green border that we've been using consistently i'm gonna give it a solid outside and then inside
i'm gonna do this dashed line and then this one we do have to fix right here so i'm going to merge
and center that here right justify that and then make sure we've got the border all the way around
it here formatting those cells and then putting that round border all the way on the let's say the
top left and the bottom that's solid border okay good so i like the way that looks we've got tax
year we'll have a drop down list of all the years we have transaction types i'll put income expense
or other in that we'll have a data validation drop down list based on whether it's an income expense
here the document path i'll put a browse button right here the document name will default that
to whatever was used here of course the user can change that the vendor issuer they can put
whatever they want in here and then the amount okay very good so let's put in some borders
around here just as we did everywhere else and then we're going to be good to go with the
borders on that and what i'll do is i'll put in probably another border just to encapsulate
everything i'm going to insert a shape on that i don't do they call them insulation here of course
illustrations let's pronounce that properly then what i'm going to do is i'm going to bring it down
here so i want it and then we don't need very many borders on that keep it there no fill on that
obviously we don't want to fill we're going to do a shape allen using consistent and let's
take a look at that okay that looks kind of nice and i like the way that that looks what i'll do
is i'm going to drop this down here this is where our button this space here is where button set's
going to go bringing this up we don't need that we'll put an icon up here we'll merge and center
everything and it's looking really good so what i want to do is i want to have tax years here
let's say two zero one eight two zero one nine and then so continuing down and i wanna have
some documents here so we'll put document and i want to have some conditional formatting
here so we need to add in that conditional format i want alternating rows conditional formatting
so it's going to be based on whether there's a value in there or not of course so i'm going to
go all the way down here i'm going to add some conditional formatting okay but i want alternate
rows so we can do that using some different conditional formatting so i'm going to add a new
one in and then i'm going to base it on based on two conditions so we're going to use a formula
it's going to based on two different conditions so equals and and then the first condition is i
want to know to make sure that there contains a value in d d and any row that's associated get
rid of the absolute dollar sign just contained d5 for any type of row does not equal empty that's
going to be our first condition the next condition is going to be based on whether it's an odd or
even row we can use the mod function for that and this is going to be for even rows so on even
rows what i want to do is i want to put in that's going to be a lighter color and i also want to
put in some borders so i'm going to format that and i'm going to do a fill but i want something
a little bit lighter than that i was using a previous color here so let's find it i'm going
to use this lighter green color here now if you want to use a previous color use the two colors
even though we're using the same color in both let's make sure it's the same color in both the
top and the bottom right so that's how we get that same color i'm going to go with the lighter color
although it's almost exactly the same so we got it the same color this light green that's what i
want to show for the even rows that have the value and i'll put a little bit of a border around
it too so i'm going to do a format and border and we'll do a very very light border not just
something like like this a little bit lighter than and we'll go all the way around the outline so
that's going to cover what i want to do is i'm going to copy this formula ctrl c click ok and
i'm going to add one more new rule so i'm going to add a new rule and then we're going to go
into the formulas we could manage the formulas now i want it for odd rows so i'm going to put
in a 1 here now the odd rows what we can do is we can keep the background color the same
but i want to have a similar border so i'm going to use a border here this color and
just wrap the border around it and click ok so this is going to be for odd rows all we're
going to do is going to have a border and click ok and then apply that okay so that's the way i
like to look i like it's got a nice look in here but you'll notice that this border disappeared
this bottom border disappeared and this one's going to disappear too when we add it so how do we
avoid that well what i want to do is you can use conditional formatting to add a border there so we
can do if so it's very simple we can do just add a top border on this one so we'll add a new rule
right and it's only based on the row so it's going to be equals row equals and it's 5 that means
only for this row right only for row 5.
And what do i want to do i want to put i'm going to replace
that bottom that top border that got disappeared when we added the conditional format all i'm do
is adding a top border for only that row and of course we only need to apply to that row and now
it's there okay i like that there it looks really good and now we'll do the same thing so what i
want to do is i want to do the same thing for documents but it's going to be slightly different
so i'm going to do is i'm going to copy this and i'm going to paste special i'm going to paste
those formats in there then i'm going to now we've got the conditional formatting here but we need to
make some changes so i'm going to manage the rules that are currently there because we just pasted
them in this one we do need this one here that's going to help us there and also we can also move
it to the top make sure it's on the top and then what we want to do is make obviously this doesn't
apply to f5 this one is going to apply to both f5 and g5 so i'm going to make sure it's both of
those because i want that top border this one here is going to be based on f5 if there's a value so
we're going to edit that based on f right because it's for documents f so we're going to change that
and then this is going to apply to what it's going to apply to f and g and all the way down let's
say to 99 or 99 or whatever you want to do okay and then i'm going to copy this i'm going
to make sure that applies to is also here and then what i'm going to do is i'm also going
to change this to f okay there we go so now we've got the same conditional formatting applied
to different so clicking apply and now we can see as we add information here you can see it's
going to automatically apply so very good i like that that's looking good we have our conditional
formatting that's applied already as we add years so what we'll do is we're going to run an advanced
filter right i want to know all the unique years based on this those unique years are going to come
here through a macro and i'm going to bring those unique years i'm going to bring them into our
income tax and paste them right here as we refresh the documents if we select the year i want
all the documents associated with that year to display there automatically okay i'm going
to bold that and bold this one too so let's look okay good so we've got a nice little and now
what we want to do is we want to add some buttons so i'm going to insert again illustration
shapes i'm going to use this square button here i'm going to add just a shape here create a nice
button and then we'll go ahead and duplicate it once we're happy with the look giving it a fill
of our let's go with a little bit lighter green on here we don't need an outline on here so we'll
go to no outline and i want to do let's call this save document very good i'm going to right
click it here and i want to go into the format the shape here because what i want to do is i
want to format the properties the first thing what i want to do is go into the text options and
i want to do the text outline here i want to make sure that there's obviously no outline and no
text field the solid feels fine for our text actually the text box here i want to make sure
that there's no margins here or maybe a slight one on the right margin .05 that's sufficient we
don't need any left top or bottom okay that's good i like that that's good and what i'm going to do
is i'm going to right justify that because we want that icon on the left and we want to put it in the
middle right once we have it the way we want it then we'll go ahead and add the icons what we
want to do is we want to add all the buttons first then the icons on top of that so save document
that looks pretty good i like the way that that looks i'm going to place that right up here on the
left and i'm going to duplicate that using ctrl d the next button that i want to have after that
is i want to have new documents so we're going to call this new document and then after that i
want to be able to delete the document so again i'm going to duplicate that using control d and
this one's going to be called delete document all right very good we'll make this one a little
bit bigger so we can get some room for some icons making sure i'm going to hold down that they're
all the same heights going to the shape format and making sure that they all have the 0.26
height that's sufficient perfect great but i want other buttons too so let's close this out
what else do i want i want to obviously be able to view the tax history so i'm going to control
d and i want another one called view taxes review tax and then we'll call it tax summary
right because i want to be able to view that tax summary when we do that everything
else is going to be hidden and that tax summary is going to be displayed so i'm going to maximize
this a little bit here and then we're going to place that directly over here so we want to be
able to view i want that document preview to show up here we're leaving that space for that document
preview inside that tax summary we want to have some additional buttons and so what are those
buttons well the first one is going to be hide tax summary so i'm going to control d i want to hide
the tax summary so we'll do hide the tax summary hi we'll just call it hide summary and that way
they're going to give it either the ability to show or hide we'll make that a little bit smaller
and then i'm going to duplicate that and i want to also be able to print the summary so print summary
good and then the last thing of course we need to be able to zip and email that summary so not
only a summary but all the documents as well so zip and email i like that that's looking pretty
good we've got all of our button sets except for the browse button so we're going to need that
so i'm going to duplicate that one more time here and place a browse button i'm going to
place that this one will make a little bit smaller i'm going to place that right here but of
course we need that a little bit smaller so it's consistent with that so i'm going to change the
height on that to about 0.22 so i like that we'll call this browse that we can actually browse for
that document that we're going to load so browse okay and then we'll change the width to that about
point seven making sure that we have room for the icon enough room for the icon that looks good okay
so we've got all of our button sets and let's move these up here zip and email and then print summary
and then we also have the hide summary so we got print summary zip and email all of these of course
are going to go and i'm going to bring these let's go ahead and add those icons now we'll put these
here for now and then what we'll do is we'll group them so that we can easily hide and show them
accordingly okay so we're good to go saving our work now we're ready to insert our icons
associated with this application we always want to do the buttons first and then so we're ready
to go okay so we're going to insert the pictures on that we can do that through here pictures and
then of course this device now i've got some saved pictures up and we're going to put those directly
inside here so let's pull them up here i've got them right up inside this folder what i'm doing is
i'm just going to select all the icons we have i don't think we're going to need this envelope one
here and then what we'll do yeah we'll put them all in and then insert those okay good and now
i'm going to size them accordingly let's say 0.18 bring making them a little bit smaller here and
then we'll position them accordingly around the application so the first thing is we've got our
screen icon here so we can make that a lot bigger so that's going to be for our application logo
there for taxes then what i have is we're going to this is going to be for our new document here this
one's going to be for our saving or updating and that'll be sufficient for deleting it of course
we've got a few options we can use the x or we can use the trash can let's go with the trash can
here and then what we want we want to be able to view the tax summary that's important so i've got
an icon here right here for viewing our tax enemy we've got to be able to hide that summary so we're
going to use a triangle for that and then also what i want to do is i want to have the zip and
email we're going to use for this one we're going to use zip and email the printer of course i need
that printer too that's going to be not a printer there folder icon is going to go here putting that
folder right there and then let's say i need print and hide summary let's add those now all right
let's browse for those additional two icons i've got some more that i want to add inserting the
pictures and we'll put those two hide in summary so it's going to be this printer here and then i
want the left arrow here that's the two additional setting those to 0.18 okay now what we're going
to do is we're going to just add those in here i'm going to hide somewhere to go right in here
and i want the print summary to go right in here okay good so now what i'm going to do is i'm
going to use my selection tool and make sure that they're all horizontally vertically aligned there
we go so now i'm ready to group these right so i'm going to group them individually first and then as
a group together because i want that summary group separate right so i'm going to group this here
and i'm going to group these these three buttons here are going to be their own group right full
need to be used for our summary group and we're going to give this a name we're going to call this
tax summary group so this group these three groups of buttons here grouping those here and then i
want to give those a group here call this tax sum group and i also want to do with the other buttons
so not only other buttons but the shape as well so this one here i've grouped these here all the
way already just grouping those together now i'm going to give it a group so i want to group
that and we're going to give that a specific name the name that i'm going to call that is called
document group because it's exclusive for just those documents so i'm going to add here document
group here okay so the next important thing to do is holding down the control i want both of those
groups i want to set the properties on both of those groups to move but don't size so we're going
to go down to properties and move but don't size with the cells so we're setting that up this
group i want to show only with our tax summary so i'm going to take it over here and i only
want to show it around right around here about a a through a e this summary so our summary is going
to end up right here okay here's our summary so this is a merge and center cell here i want to
put that summary in right here that summary here is going to be called tax summary so i'm going
to i've got it already merge and center just a little bit quicker there so we're going to
give this name called tax summary but i'm going to put it inside a formula because i want
that year to be dynamic so i'm going to put in tax call this tax summary for year ending and then
i'm going to put a space and then we're going to put the year but not yet the year is going to take
on a formula so we'll be adding that year in this area this merging center cell here this is where
our graph will going to be going then what i want to do is i want to put in our income here so i'm
going to put in total reported income down here i'm going to put total expenses and credits so all
the credits that you're going to go to remove from your gross income and then i want total taxable
income here so that's what i want to show here we're going to of course make these cells white
here because we'll they're actually i'll make them just a light green that lighter green should
be sufficient here because it's not a user entered field i'm going to format those cells all the
way around here and then what we'll do is we'll use our of course our green consistency and we'll
do all the way inside and outside of the borders and then this put the dotted line on in the middle
there i like the way that looks i'm going to put a dotted line around line around here so formatting
those cells and we'll keep this open so we can format those cells accordingly all right so i like
that and then for this area here what i'd like to do is i like to have a border here a larger border
up here but i also want to have the header names up here what are those header names so i'm going
to put in transaction type i want to know the transaction type i also want another form or the
document type we'll put in doc type and then next up what i want to have is the document name what
is the name of that document and then issuer who issued it was it a vendor issuer issuer so put
that we could probably put in vendor or issuer because it could be either one whoever issued
that could be a business it could be your company that you work for and then lastly the amount so
we want to have the amount in there okay let's format these based on our current theme so we're
going to add format those and then what i want to do is i want to add some fill effects there just
as we've been doing with our with our theme here using the two color greens that we're going
to have so i'm going to go from the mid to the lightest there that's sufficient there and
then i'll do give it some internal borders here so and then i want to do a thick border let's
do a thick border on the top and then inside the left middle and right and the bottom we'll
do them i like that and just around here we'll do the thick border because i want that going to
be printed out so i wanted to make sure it looks nice because that also is going to be printed
out and zipped up so you can send that to your accountant so i think that's kind of nice so that
they get it not only do they get all the documents but they get the summary as well okay looking good
and then here what i want to have is conditional formatting based on that now that conditional
formatting is exactly the same as the conditional formatting we had here and here so all we need
to do is copy and customize so ctrl c and then we'll do is we'll paste special of course you
can paste the formatting here as well using that now that we have those conditional formats pasted
in there we can go ahead and manage those rules then we can update them accordingly so for this
one of course it's not going to be row five we're going to change that to row nine row nine
we want to make sure that top order is consistent so formatting those and it's going to apply to
the entire top row all the way from aa so we're going to select a9 all the way to ae 9.
Okay so
for the next one right we want mod row but it's not of course it's going to be the columns got to
be adjusted 9 is correct but it's not column d we now need to update this to a a so we'll change
this to a a and clicking ok and then i want to change this as well also instead of d i want to
change this to a a and now all we need to do is update the applies to so we'll select in one of
them again putting down and then all we need to do is update the last row we'll go with a high row
say 999 that'll allow us at least for a thousand or so okay so we're good to go on that now i need
to just copy this and paste it down here now we've applied those and now all we need to do is just
check to make sure so we'll just add in some data here and to making sure that that looks good
that's the way i want it there looking very nice okay very good actually let's kind of update this
one i like this one i want to be a little bit lighter here so i'm going to just going to manage
that i'm going to change this dark green we've got a lighter green i'm going to change this to white
i want to change something to to just white so let's go here and edit roll something a little
bit lighter because i want to make sure that that data i'm going to do a fill and fill is white
here let's take a look at that see how that looks and then we'll maybe change it i'm going to change
this one to lighter green because i want them because it's going to be a report i want to make
sure that it's very easy to read and so let's go into fill effects i want to choose the lighter we
can choose it from here that's kind of nice okay i like that that's good we can do this two
color here good okay that looks nice i like that clicking okay and then apply okay good so i want
to make sure that it's very light and easy to read that looks really nice continuing on so we've got
our summary here and we've got everything ready we're almost ready for vba and that's going to
help us add our data we'll be adding in of course the data as we get it in here so we've got some
data validation here now this transaction type is going to be more than one type right i've got
really three different ones that could be we have income we have expenses and we have others so
those are the three different transaction types that we're going to be working with so let's
go into here and add those three into the data validation so here we're going to add a brand
new data validation so we'll go ahead and add it in here clicking here data validation right i
want three i want to list place and i want income expenses and other okay so we'll do expense and
other the names are very important because it is those names that we're going to use inside name
range so income expense and other okay now keep in mind inside the named range i've already
created three different lists so we're going to go into the formulas the name manager and we
have here we have income type we have other type and we have expense type now each one of these are
related to the list as using a dynamic named range using the offset so we have form types we have
expenses that are going to cover all the expenses we have income that's going to cover all the
income and of course we have other that's going to cover all of the other here so here we can see
all the other so it's going to be those two things right here so what i want to do is i want to
create a data validation so as we change this to income expense or other this data validation
this record change data validation list is based on whatever it is in here so whether if we choose
expense it's going to be all of these if we choose other it's going to be all these and if we choose
income it's going to be all of these now we can do that using vba so we're going to get into that
in just a moment so as we make that change i want this data validation to change so we also another
thing that we need to do with vba is we need to know which year we need a unique list of years
now we have some data with all the tax information here what i want is i want a unique list of years
based on all the data so we're going to extract that using of course advanced filter without
criteria and we're going to getting our unique list of years and then it is that list of years
that we're going to bring over inside our income and have it populate this area here great so we've
got that covered we understand how we're going to build that we're going to do that with vba there's
a few things that we want to add inside this application some formulas and some information as
we created not too much so what do i want i also want to keep track of certain things on the admin
i want to know the selected year and i also want to know the selected document right so i want to
know the rows of that and i also want to know the document id each documents can have an individual
id i also want to know what row that document is associated with what database row and then i want
to know the next document id okay so we want to know all those information now these are selected
these are going to based on conditional formatting and what i mean is when i select it i want
conditional format high like that so for example if this is 6 i want conditional formatting to
automatically show that and if this is 6 i want to also show so these are row selected document i'm
going to add that i want to select i'm going to add that row to that because i want to know what's
row selected document row making sure that that's clear okay expanding this so we can see that and
i'm going to left justify this that is it that's relatively all for the admin it's relatively easy
and then i'll just give this a unique color so we can highlight that it's for admin use and of
course that column is going to be hidden so we're going to use all the borders right all let's just
do all the borders here all right so what do we have i want to know the document id and i want to
know the document row now i have a named range for document ids if we look in our database we see we
have document ids if we go into the formula i've already created a name range called document
id if we look down here we see that we have using the offset all the document ids okay so what
do i want to have i want to know the row that's associated that means if document id is displayed
i want to know what's on row four therefore if uh let's go to the right sheet here randy if document
id here is set at one i want this document row to show four so we're going to use equals if air we
use the match formula and what are we looking up i'm looking up this document id and what i'm using
i'm using the match right obviously and then i'm going to use the lookup array that's what i meant
the lookup rate is going to be that document id i'm looking it up and i want an exact match so
i'm going to use 0.
But i want the row number i don't want it to return 1. that row number that
first one is going to be on row 4. so we need to add 3. if it's not found or there's an error i
just want to show empty okay so that means the document row for one is on row four document two
is on row five perfect that's exactly what i want i also want to know the next available document id
we can use the max formula to do that we're going to wrap that on if iferror because if there's no
data at all it's going to create an error so we're going to use the max formula and the document
id i want the max of all the document ids plus one i want to know that next available document
id if there's no data it will create an error so i just want to set the default if there's no
data to one that's the first available document id so we know that our next available one's 29 and
if we look inside our database and we go all the way down to the bottom we see our last one's 28
and that means our next one's 29 that's exactly what we want all right let's bring this up here we
will just show just the tabs for now and so we've got all this information that's all we need let's
save our work what i want to do is add just some conditional formatting here i want to know i want
that selected row to be highlighted in green so as we add rows i want to know so what we're going to
do is we're just going to go into the home and add two more conditional formatting manage those rules
and i want that rule to be on top so i'm going to create a new rule here and that's going to be
based on the row of a certain of a certain cell so equals row and then it's going to be equal to
what that year is going to be based on here selected row if b2 is equal to selected raw i want
to give it a unique format i'm going to give it a fill effects here i'm going to go that light green
or the middle green to very dark green and i also want to give it a font color the font is going to
be bold and white all right i like that that looks good and so that's going to be sufficient click
and ok and then apply it and making sure that that works good that's exactly the way i want
it i'm going to do exactly the same thing for documents so i'm going to edit that just copy that
make it a little bit quicker but not much quicker create a new rule right and then use a formula
and of course this is going to be based on the row and it's going to be based on b3 i'm going to use
the same exact so going to the format the fill fill effects here the repetition helps us remember
these things again using the same color the same consistency here clicking ok font is going to
be bold and the font is going to be white all right so i like that and of course the apply 2 is
going to have to change on that so that applies to is going to be from our f5 through g so let's
tab over here and update that accordingly and then we'll just go down a bunch of rows we also
need to go down the rows for this 999 that's a lot and this is nine nine enough sufficient okay so
we're going to apply that and there we go okay so now we see as this changes right so does our
year as this changes go to five which is our first row it changes the year that
row when we make a selection change that will change i will put whatever row we've
selected in here i'll put whatever row we've selected in here very good i like that the rest
will come through vba and that's exactly what we're going to get into right now we are ready to
go into vba and do a few things the first thing what i want to do is when we make a selection i
want to put that row here and then we're going to create a macro for that so let's do some of the
on-chip code that means the code that happens on the sheet when we make a selection or when we make
a change we want some things to happen so what is that well we're going to do that inside vba we're
going to go to the developers tab to get into vba we're going to go into visual basic there's a
shortcut called alt f11 that will get you there and we can hide this code that's for our sample
right we don't want a sample i want to focus on our actual document they're working on so we have
our income tax here this is the sheet we've got three different sheets here the code names are
admin income tax and tax document we also have modules where we've created just a little bit
but i've got nothing inside these macros we'll be writing them together except for this one it's
kind of basic and then of course we have document macros which will handle the document and we have
our tax summary macros we're going to be able to show hide refresh and print and zip an email
where i've just done some dimensions and variables to make things a little bit quicker but what i
want to do is focus on that on sheet code right remember we're going to focus on on sheet and so
the first thing what we want to do onset is we're going to make a selection change so we're going to
go into worksheet and then selection change right because we want to focus on making a selection
change on those years right if i make a selection on anywhere from d5 on down and making sure that
d contains a value we want something to happen so let's write that up right now so it's based on
a selection change right and if it's a specific range so what is that range of course it's going
to be from d5 all the way through let's do d99 and we make a change d99 is nothing and of course
we need to make sure that there's a value in d nothing and right if not intersection means we're
actually making a selection change to that range not and nothing cancel each other out and range
we want to make sure that d contains a value d and the target dot row dot value does not equal empty
only then do we want to do something and then what do we want to do well the first thing what i
want to do is i want to make sure to add the word then i want to make sure that range b2 range b2
takes on that target row value equals target dot row set the selected row year it's the year of the
year row okay i want to make sure that we do that okay so now what i want to do is i want to load
a macro obviously we haven't written that macro but what is the name of that macro the macro is
going to be down here i want to load some specific documents so how do we do that well we're going to
create a we want to actually make sure that we run the macro to load those documents when i select
a year i want all the documents to load for that year so that's going to happen now it is this
macro right here that we have not written that it's called documents list so it's inside the
documents list and it's called load the document list we also had to load the tax years so it is
this macro nothing's in there that that we're going to be running so we might as well write
that in right now and just have it them and so what this is going to do is going to run
macro let's put the comment there run macro to load list of documents for selected year so
we only want documents for whatever year has been selected i also want to make sure that we're going
to actually add in something a little bit later on which is going to be making sure like if i select
a year and that summary is i want to change that summary so let me better write it in case
i forget so here's what i'm going to show you if what i want to know is here right at some
point we can get rid of that for now if i'll comment that out for now so what i'm going to do
is if i want to know if they select a year and we have this summary now either we're going to have
two choices either we're going to be displaying this or we're going to be displaying this but not
both at the same time right so my idea well way too far so my idea is here if we have this
summary visible if this summary is visible i want to refresh the summary right i want to
know only those particularly transactions for the given year if this is visible right so how
do we do that so i'm going to format this i'm going to put the border around this i like
that a little bit better all the way around okay good so so what i want to do is i want
to know is column a a visible or not i just want to run a test if the column is hidden right
then i want to make sure that we're not if it's not hidden so let's add that in so basically when
i select a year i want to load the documents here and i also either i may want to update this
summary if it's visible so we can do that with some code so let's continue writing that code
now and so we know that it'll kind of all come into play a little later on but it's easier for us
to write the code now and then after we come back hey what i want to do is i just want to check
to see if column entire column dot hidden equals false then what do i want to do then i want to
refresh that schedule i want to run the macro that's going to refresh that summary of all those
documents then then what do we want to do well then i want to refresh it is this tax number we
have a specific macro that's located it's going to refresh it this is the macro that we're going to
write so it is this macro that i want to refresh all of them so i'm going to put that directly in
here then and here's the explanation so refresh yearly summary if visible okay we're just checking
to make sure visible and that's all we need to do that's relatively simple okay good i really
like that that's good that's all we have to do for that pretty simple now what else do we
have to do while we're on selection change right this is only if we're selecting years but we also
want some things to happen if i select a document right if i select a year i want so notice how
that's changing now you see how it's changing perfect now what about if i select the document if
i select a document i want that document to load right i want to load whatever document i want that
preview to show up here of course we're going to need more space for that right so we're going to
need the space for that document and that's fine that's perfect and so we're either going to show
this section or we're going to show this section but not both we're going to use this button to
hide it we're going to use this button to show it okay so that'll come into play in a little bit
so as we are on selection change when i select the document i want a few things to happen one i
want the row that we selected and i want that row to go directly inside b3 and then i want to run
the macro that's going to load that document so let's add that in right now so let's let's update
this so we can just we're clear with the comments on selection of year okay so we're good with
that now what we also want to know on selection of a document so let's write in a comment here
commented on selection of document and we can just pretty much copy and paste this and then
update the row so i'm going to copy this here and i'm going to update those columns right
we're not focused on column this time we're going to be focused on f through g f through g
we want to make sure that f contains a value so f through g we need to make sure that f
contains a value but this is going to be f through g and make sure we add the end if right
so everything happens in between and if that what do we want to do well that's going to be focused
on selected row of the document so i'm going to copy this but that's going to be based on b3 b3
is going to take on that row and that's selected document row selected row for document right this
is a specific document when we select that we want a few things to happen the first thing would be
of course we want that target row so that we can automatically add that conditional formatting and
then next up we want to run the macro that's going to load that document right we haven't written
that macro yet but that document is going to be right here and it's going to be called here
document preview right we've got document preview and we have document load so it is this document
load here that i'm going to add in i want to load the selected document and that's what's going to
be here so here we can do this but i also want to do one more thing i also want to add in whatever
is in here i'm going to put that document id i'm going to place that right in here so the id is
going to be hidden it's going to go in column e remember every single document id when we run
that's going to have an id we have a document name right and we have the form type so we have
all that information but i want that document id because it is that document id i want to place
directly in b4 so i'm going to place that directly in e but you won't be able to see it well if
you will as i'm doing this but of course when we release them you can easily make them hidden
a few different ways so from e is going to take on you will take our document ids when i load all
those documents when i run the macro to load the document id will go here in column e the name and
the type okay so e will take on that so whatever is in e i'm going to place directly inside b4
so that's the first thing we're going to do range b4 dot value equals where is it going
to come from it's going to come from range e and the target dot row dot value that's going
to be our document id now once we have that i also want to place i want to run that macro document
load so this is going to be run macro to load document good i like that that's good so we've got
everything there so now of course there's nothing here but you see there's nothing which is fine
because once we put an actual data here perfect so that's it for the selection change event so
we've written all the macros for selection change but i've got more i want to know now we're going
to focus on a worksheet change event so i'm going to go in here i'm going to put in change and
now we're going to write and click ok so that's fine now we're going to focus on some changes
based on the worksheet that means when the user actually makes a change right so one thing i we
mentioned when i make a change to here and for i want something to happen right i want the data
validation here i want this to be either income list expense list or other list so we've created
three named ranges so i want to create data validation based on that but i only want to make
sure that kind of changes any kind of change but making sure that it's not blank so that's going to
be a change based on n4 so that's what we're going to write right now and it's going to be based on
that so changing if not then right let's add then n4 right n4 but i also want to make sure that
n4 contains a value so and range n for dot value does not equal empty then i want to do something
right we don't need two then so that's just one and sufficient for our purposes or anytime okay so
then what do we want to do well when it comes to data validation the first thing we always want to
do is delete any data validation that's in there so m6 we're going to delete that data validation
so that's the first thing we're going to arrange m6 because that's the cell putting it in
dot validation dot delete okay delete any data validation we can't add new or update
anything unless we first delete the existing okay so next up we're also going to do data validation
but this time we're going to be adding data validation it's going to be based on what based on
conditions we're adding three different ones what are we going to be adding if we look in here we're
going to be adding to either three different types either we're adding income type writing other type
or adding expense type now notice the names are all very similar based on this value all we have
to do is add the word type based on this so when i add it it's going to be based on that don't worry
about that we're not done with that yet we're not done with that yet so what we're going to do is
we're going to add it right dot add i need to add a validation type and of course what type we're
going to be adding we're going to be adding a list type right so let's go down here it's going to be
list and then what do we want to do i want to make sure it's going to be alert style stop so we'll
do xl valid we want to stop if it's incorrect alert stop right we want it to stop now what are
we going to add we're going to add a formula on to that right so i'm going to go here and what
is that formula we're skipping the operator and we're going to add a formula so it's going
to be equals and what else and i want to add that named range but what is that named range
that named range is based on whatever's in n4 income type expense type or other type so range n
for dot value equals that right income expense and what else and we need to add the word type at the
end of it type okay good i like that let's take a look at that now let's work it out okay let's get
rid of that equal don't need that in there okay so and the type so we combine the name income
expense or other with type this is going to be our complete named range with the equals okay good
let's take a look at that and now so when i change that we don't need that there all right let's
take a look at that changing this to expenses now we have a list of expenses let's look
and double check our data validation here right looking in the data here checking our
data validation to make sure that it is accurate and then clicking yes and then this expense
type perfect that's exactly what i want making the change to income here and then
checking our data validation again making sure that it's income and now of course when we
go into the data and we check our data validation merge cells it's okay and we see that it is our
data value let's go here again check that here income type perfect so that's what we got and then
lastly we'll double check our other here making sure that we have it data validation making sure
that it's different of course we can look at the drop down list we know this is the three items of
others so we know it's working correctly all right very good so our data validation is working that's
it for all of our on-sheet macros that's it for all these macros that have to do with onsheet what
i'd like to do now is focus on the document right so what we want to do is some of the documents
we need to do a bunch of things right here so i want to know first of all our unique lists
and we also want to get the browse folder so let's get that in let's start out with the first one
let's get a brand new unique list of all the years based on of course all the data here so how do
we do that well we're going to go inside here inside our document macros module and tax years
we want to load the unique list of tax years so how do we do that well it's relatively simple
with an advanced filter but we want to make sure that when we're running this type of an advanced
filter that we don't use any criteria the reason is there's no criteria all i want to do is get
a unique list of years and i want to place those lists of years here so let's do that right
here the first thing what i want to do before i add that unique is i want to delete any or
clear out any years that are associated here so on this screen we're going to clear out any
years so that's the first thing i'm going to do income tax that's our sheet name income tax
dot range d5 through d999 let's just do 99 dot clear contents clear any existing gears okay
next up what i want to do i want to really focus on the tax document database so with tax doc
database we want to make sure we have the name right so we're going to use the period that
triggers intellisense and we know we've got the sheet name right okay so moving on one thing
we want to do is we want to clear i just want to make sure that we're clearing any previous results
those previous results are going to appear inside our tax document database on columns right here
m3 all the way on down so i'm going to clear that out first so dot range m3 now we're focused on the
database through m999 dot clear contents dot clear content clear previous results once we're ready
that i want to get the last row now that last row is going to be equal to based on column a that's
going to set us our last row of data last row of data of data now i use autohotkey to automate that
to help me a little bit faster so now if last row is less than in this case four if that last row
is less before that means we have no data so we're going to exit the sub now we're ready to run our
advanced filter but before we do that when we're running an advanced filter with without criteria
i want to make absolutely sure that there's no criteria right so the best way to do that is to
make sure that we've deleted any criteria so we can do this with dot names and i've added on
air resume next because if there is none then it could create create an error so criteria dot
delete right i want to delete any criteria delete any criteria now if we're just using an advanced
filter with criteria it wouldn't matter it'll replace the existing but since this one has
no criteria and i'll show you that in a minute we want to make sure to delete any criteria and
on air resume next okay so now that we have that we're ready to run our advanced filter and i
can automate that a little bit quicker using auto hotkey let's set up the data let's take
a look at the data right i'm really focused on years right all i want is unique list of years so
our original data is just going to be that those tax years original data is located directly inside
only on b3 all i want is unique list b3 so that's all we have to do is put in b3 right our original
data is b3 here b3 through b in the last row no criteria right there's you know all i want
is unique list so i'm going to clear that out remember there's no criteria here where do we want
to copy that to we want a unique list we're going to copy it directly to m2 so m2 we're just
going to change this up and just change it to m2 we do want a unique list true that's very
important then what i want to do is i want to determine the last row of those results once those
results come into m3 right i want to know the last results row so the last results row is equal to
what right basically it's going to be equal to not whatever is in m so we're going to change
this to m this is the last row of the results last row of results i want to check to make sure
that that those we actually have less than right if it's less than 3x the sub that means we have
no data if it's less than three then no data so if last will slow s less than three then exit
the sub if it is not less than three what i wanna do then then i want to also sort it right i
wanna sort it based on the first year first right but i wanna check if there's only one row
of data let's say that the last row is four there's no reason to sort it right so if the last
let's we can do that again using autohotkey a little bit quick if the last result is less than
four then i want to do something i want to go to let's just call it single year and then it's going
to skip the sort so we're going to do a single year and so what that's going to do is it's
going to skip the sorting we don't need to sort if we have a single row of data but i do want
to sort it based on the years so now we're going to focus on that sort we've got multiple rows of
data so with dot sort and the first thing what i want to do is i want to clear the sort field sort
fields dot clear clearing all those store fields next up what i want to do is i want to add a sort
field clear right i want to sort them based on the year so the lowest is first so dot sort fields
and then we'll add add a key right and what is that key is going to be equal to it's going to be
add let's call it key it's going to be equal to and we've got to call out that sheet again tax
document database because we're inside a sort dot range m3 that's our key right and now what
i want to do is i want to sort on i'm going to sort on of course based on sort on value so sort
on equals excel sort on values and then what i want to do i want to sort it by ascending so
order is going to be equal to xl ascending right because you want it from the smallest
to the left smallest to the largest ascending okay and then last on we want to make sure i
spell that right probably not ascending data option equals excel normal excel normal sort
normal right sort normal okay let's take a look at that because usually i mess this up add
fields tax document m3 that's our range right that's our first sort on sort on values order
equals ascending data option equals normal looks pretty good okay what i want to do is i want to
set the range that's pretty simple so we're going to set the range of that of course it's going
to be based on m3 in the last year again what we want to do is we want to make sure we're
calling out the sheet tax doc database.range m3 of course that's our the first one through
m and the last results row last result row okay that's where consort and the last thing is dot
apply okay so we're just going to apply that there so we can apply that we're good that's
end of the story that's all we need to do so once all the data gets sorted then all
i want to do is bring over those results now i want to bring over those results whether
it's a single year or multiple years so we're skipping that now we're ready to bring it
over okay so we're going to do income tax this is where we want to bring our dot range we want to
put it in row d5 right the first row here is d5 of our incontext all the way through d in
the last row la and the last results row last last result row however notice our starting
row here is on five our row here is on three so we need to compensate for that so i'm going to
add two onto that dot value is equal to based on again our dot range based on our database here
dot m three through m and the last results row last result row same as our range dot value
okay so that's going to bring over all the basically all the years okay good saving
our work here we're going to run the macro always want to save before we run our macros so
we're good to go okay let's run that macro and see what happens in running we've got our years
here let's take a look inside our income tax here and we've got our years here now we've got 2018
all the way the only other thing i want to clear that probably when i run this i probably want
to clear the selected row probably right so let's go ahead and clear out b2 as well and then
we can do that all the way up here so as we add the traction i'm going to add b2 to that right b2
because when we restart the list we really want to clear out that sort let's run it one more time
here and take a look here okay take a look all right that's that's good i like that it cleared
out the select row i'm going to center that all the way down here and we'll get it centered
all right so we've got this data centered there looking pretty good that's very nice okay so
now what i want to do is i want to load all the documents that are associated to that year okay so
when i run this macro remember we've already added that i want to load all the documents associated
with the year so we're going to run an advanced filter right when i click here that's exactly
what happened i want to know what year i want to set a criteria based on the year how do we do
that well we can do that right here i want to set that tax year notice the tax year is here already
criteria based on whatever row we've selected how do we know what row is on well here's what
we do know we know that this is row 6 right if we use an indirect formula and i know that we're
going to do from column d and whatever is in 5 i can extract the year using the indirect formula
and we're going to use that right here so if error indirect again focus on income tax column d and
whatever's in b2 and of course that is also going to be using a1 style so it's true if there's an
error show blank that is what's going to happen as soon as we have if we have the criteria here we
know what gear to filter by we can take all this data this is just some extra data we don't need
that here we can take all this data here and then what i want to do is i want to know all of the
documents associated in that specific year i want to put the results in right here then i want
to bring all this information over and i want to bring it directly remember i said the document id
is going to go be hidden kind of and it's going to go in column e the document name and the document
type so again document id document name document type bringing all that information in okay so
let's write a macro to do that right now that's going to be next up on our mac or list it's called
document loads list so that's what we're going to do right now so let's set that up here so how we
going to do that well the first thing we're going to do is again we're going to do clearing out
all the information just as we did before so what i can do is just copy that here and then update
the let's do this i'm going to copy this one here and then we're going to update this so i'm going
to instead of course b2 it's going to be b3 i also want to clear out any selected document row
based on b3 but i also want to clear out all the documents that are that's going to be located from
e starting in that e all the way through g right so again what i want to do is i want to clear out
any when i'm reloading this list i want to start out clearing that document id all the way starting
at e5 all the way through g and clearing it out okay clearing out all the existing right that's
going to get us again we're going to do the same exact thing we're going to run an advanced filter
but this time we're using criteria and we want those results coming in here so we're going to
do pretty much the same thing as we did last time just a few different things again we're going to
focus also of course on our tax document database i also want to make sure that b2 right i cannot
load remember just to be just to build check right we if we have no tax year it's going to create a
problem right we need to have we need to make sure that b2 contains a value we must have a selected
tax year right so how do we do that so i want to make sure that b2 contains a value just in case
it doesn't just an insurance program so if if income tax dot range b2 dot value equals
empty then let the user know message box please select a year exits up right nothing we
can do unless we actually have a year exit sub okay good so now we've got that now what we're
going to do is we're going to focus pretty much primarily on that document database so with tax
doc database making sure that we have right again what i want to do is i want to get that last row
that last not that one again what i want to do is i want to get that last row that last row is going
to be based on column e right if the last row is less than four then exit the sub right and then
what i want to do is i want to run my advanced filter so we're good to go as long as we have data
so the advanced filter of course we're going to use more data this time so we're going to what
do we want to do i want to get all that document information i want to bring that in so let's take
a look at what results we want to focus on and get that so inside our tax database of course we need
the document id we need the document name and we need the form type document id form type and the
document name so we need to go all the way from a through f i need to bring all that information
here so original data is going to be right here under a three right our row headers wrong
column three through f that's what i want where's our criteria our criteria is going to
come directly from here that tax year is going to be our criteria here o2 through o3 o2 through
r3 that's what's going to be our criteria so i'm going to update that from o2 through o3
and where do we want those results going to come from those results are going to come from
q going to q through s q 2 through s and we want unique v2 that's going to get us our results then
we can focus on our results so the last results row is going to be equal to of course going to
be focused on q right q is going to be our last let me use q is to get our last results row of
those results so that's going to be column q and of course if it's less than 3 then we can
exit the sub out so so if the last results row is less than 3 then x of the sub assuming that we
have data then we can now move on i can bring that information over so how do we do that well that's
relatively simple so tax so let's do income tax dot range focus on e5 e5 is the first row and the
first column through g and the last result row again plus two because our our starting row is on
three and our database that value is equal to dot range q2 q2 through s and the last results row and
that's going to bring all the way over that okay so q3 our first results are a 3 not 2.

Good i like
that that's going to bring all the information over okay so let's copy that now we remember this
macro document load list automatically is already set to run as soon as we make a selection change
on year remember here's our selection change d5 if document loads list this automatically sets a run
as soon as we make a selection change on the year so when we go back into income tax and we can save
our work before running the macro and we select a particular year now we have it okay so now here
we see the roads we don't we know the rows there but we don't need to see them so obvious so i'm
just going to change the color of them make them a little bit lighter generally you want to make
them the same color as the background the same color as the background but we'll do that we'll
make them a little lighter but for your purposes you want to make them the same color or you can
use three semicolons in the conditional in the formatting to hide them entirely so now we've got
our document id now when i make a selection change look we have the document row that's loading in
everything is good so we have the document id here as we load it in that document id is loading
exactly the way we want to now all we need to do is run the macro that's actually going to load the
information right so now we know what document row row 11 right so if we go into the tax document and
we look in row 11 we know that we're going to load all this information inside here and we're going
to use data mapping to do just that we know the tax year is j4 we know the transaction type is n4
we know our tax returns the form other type is on m6 so we know that those ranges so we also have
some columns we know that in looking row 1 we know the tax year is j4 we know the transaction
types n4 we know the form types is m6 so knowing that information here we can then bring
in our data mapping very very easily onto that so let's do that right now saving our work and
we're going to run the macro that's actually going to load that information in and that's going
to be our next macro up so we're going to go into the document macros here right here this is our
sample i don't want to get you confused with that and then so we're going to now load it i think we
can close that sample out okay samples closed all right so what i want to do is i want to bring all
that information in so let's go inside back that tax document and we have save update right so
we've got to save update but let's add let's skip that i'm going to add that load which is this
one right here document load and then we're going to go back out because that's the next one in line
so loading that document is what we're going to do is relatively easy document so let's add that in
right now so the first thing is we're going to do is i want to clear out a bunch of cells right i
want to clear out all those cells so we're going to focus primarily on that so with income tax i
don't want to clear out a bunch of roads i just copy and paste it's kind of a lot of typing so
let me just copy that from some sample i got here make it a little bit easier on me and you so you
don't have to watch me type in all those ranges so basically i want to clear out all those
cells that makes it easier for both of us then i don't cry all right so let's and now what
i want to do is if there's a preview remember we're going to have a document preview up in this
space here right and so what i would like to do is i want to have give it a specific name each and
every time i'm going to call it document preview i want to make sure that when we're loading it that
preview of that document gets deleted it's always going to have a very specific shape if it doesn't
exist it could create an error so dot shapes i'm going to call it doc preview give it a very
simple name dot delete right i want to delete it and then on air resume next on or go to 0.
And the
reason is that if it doesn't exist it could create an error so we want to route that also what i want
to make sure is the when we're loading a document the most important thing is that we have the
database row that's associated with that document that database row is located directly here
inside b5 if that is empty for any reason then we know we have an incorrect the reason is we
could have a new document so we want to make sure that b5 contains a value if not we need to let the
user know so if dot range b5 dot value dot value equals empty then let the user know message
box please just let them know please select a document and there's nothing
we can do unless we have that exit sub and now i have dimensions already some variables
up here to help us long i've got document row which is going to help us in document column
we're going to need those things and of course i have last row which we're using in result row
so those are all up at the top so i want to get that document row that document row is going to
be exactly in b5 so i'm going to take that and i'm going to put that up here so document row is
equal to whatever that's our document row once i have that document row then what we can do is
we can then load it up okay but what i want to do is just make things a little bit faster i'm
going to turn off screen updating so application screen updating equals false and i want to make
sure we don't exit the sub when we turn it on before we do it so just copy that here and then
make sure that we're turning it on before the macro runs that's going to make things a little
quicker equals true so inside here is we're going to do the work so inside there what i want to do
is i want to run of course a loop i'm going to loop through all the columns in that so how do
we do that we already have the id so that's in column one so we've got column one covered here
the document id so what i want to do is i want to run it all the way to let's say our notes and
what is our notes equals column nine so i want to run a loop from column two to column nine and we
have a variable called document column to do that four document column equals two to nine and
making sure to close our loop next doc column okay and inside that loop what i want to do
is i want to load the data that load dot range where is it going to come from right so we know
to make sure that we're going to load it up we have that range located inside where it's
located inside the first row tax document database remember that range on row one cells row
one and document column that's our range dot value so this right here is our range this is m right
here this is m4 j4 whatever that's our range so dot value is going to equal what it's going
to equal whatever is inside the row of that so tax document database dot cells whatever is in
that row not clear arrows never use that dot cells and then what does that wrote that document
row and what is the column that document column whatever data is in there i want to bring over
dot value okay so that's what we want that's all we need to do it's very very simple to bring in
all that data using data mapping if you haven't seen it before then let's go so great i also what
i want to do is i want to add in some additional information so i want to make sure that the dock
in preview now let's say i want to run a macro which we're going to build up coming up next if
we have a document path located in j8 i want to make sure that that preview of that document is
visible runs a macro so we're going to check if j8 right does not equal empty then we're going to
run the macro that is going to actually load that document preview so we're going to check on that
right now if dart range j8 does not equal empty then run the macro what is that macro that's
going to load that document it's right up here document preview there's nothing in here now but
we're going to be adding it up then run the macro if there's a value run macro to preview document
those documents can be pdf pictures or whatever all right great so we've got that now so it's
going to run and that's it that's all we have to do on that sub so it's pretty much easy
relatively easy to load that information in okay great saving our work before running the
macro then what we're going to do is we're just going to load it up now of course we don't
need the extra s in there that's certainly not necessary and then we also need to add
in the correct variable which is dot column here continuing on okay it looks good all right
so we've got all of our information here perfect i like the way that that looks all the information
now what i'd like to do is get that visible let's say get that preview of that picture or whatever
that document i want to place it directly inside p so let's do that now let's write the macro because
it's part of continuation that's going to preview that document so continuing on we're going to go
back up here we want to show document preview so how are we going to do that well first of all
one important thing is we need to know where it's located it's going to be located in a specific
folder that we've already outlined we've outlined it here inside this dropbox folder i want to make
sure that we're browsing for the correct folder i want to make sure that that path is located here
if not we can browse for it here i don't believe i have a macro assigned to that but we'll browse for
that we'll be adding the macro but you could just easily paste of course the path in there but we'll
add the macro okay so we have it so it's going to be located here right in c3 and i've given it a
named range called document folder document folder that name range i'm going to copy that that's
what we're going to use we want to make sure that that's accurate right and when no no because
if that's not accurate if we have no folder that's located and of course we cannot load the document
so that's the first thing we want to make sure inside our document preview so we're going to
focus on with the income tax with income tax and also the first thing we also want to do is
i want to delete any existing preview i'm going to paste this here just for a moment and what i
want to do is again just like we did before in clearing that out i want to delete any preview
i'm just finding it here where we added it in don't remember so here it is right here so i want
to copy this this here basically we're going to do that right we when we were loading a brand new
one in we want to delete any previous one right so that's all that that's going to do is delete any
previous document preview so we can add that in okay so now what we're going to do is i want
to make sure that we have the right document folder that's what we're going to focus on first
first of all let's put in the file path i've got some strings already set up dimension document
folder here file path here and file name here we're going to be using those let's update that
also we need texture and a few other things so the first thing what i want to do is i want
to set that file path that file path is going to be located in j8 equals whatever is in dot
range j8 that's the full file path that value okay so that's it that's all we need here to make
sure because if it's not correct then we're good so if the file path is empty then we're going
to exit this we're going to this is going to be the document file path so if that's empty we can
get rid of this for now we'll need it in a minute if the file path is empty right then we not want
to we know it's incorrect or perhaps if it's incorrect if it's incorrect or if it's empty so
how do we know that so first of all we can do if let's do this file path equals empty then exit the
sub just just in case just to make sure right exit on no doc no doc no file path nothing to load up
okay now what i want to do is i want to check to see if it's accurate okay so here we can go this
if the directory of the file path dot vb directory equals empty that means there's something wrong
or then what do we want to do then of course i want to let the user know message box see if we
can spell it right this time what is that message box we want to let the user know please make
sure to make let's say the document file path is correct or browse for a new path okay then
let the user know to browse so we're going to write a macro right going to browse for document
path that macro is going to be up here browse for document file right i want to let the user know
to browse first that's the macro we're going to write in just a moment but we're going to give
them the opportunity to do that once they do that then they can get the right path so that's very
easy then what i'm going to do is i'm going to set that file path one more time right giving
them the opportunity to browse for it copy it and then if it's still empty setting is setting
that variable one more time set variable again now if it's incorrect or it's empty now we're going to
do if i'm going to copy this one more time if it's still empty or still incorrect then we're going to
if then exit or we can do or right or it's empty let's see it's complete or it's empty or file
path equals empty then exit sub right giving them a second chance but if not then exit the sub
out exit on incorrect path very good so that's all we need to do let's fix that up or if it then got
to put the if in there that's kind of important continuing on now that we've made sure that we do
have a correct path and everything's looking good what i want to do now is i want to make sure that
our tax summary is visible right what i want to do now is i'm going to just run a check right if
they're clicking on this area here i want to make sure that column ii is visible it might not be
visible if we're showing this if we're showing these columns it would not be visible so i
want to just double check to make sure that it's visible if not show it okay so we can
do that with this check here so if dot range i through i i'm going to check on that in column
dot entire column dot hidden equals true if it's hidden then i want to run a macro that's
going to be called tax summary hide right so inside here i want to show the tax summary so
right tax summary i want to hide excuse me i want to hide the summary i'm going to hide that
summary hiding i want to run a macro it's called hiding this summary we don't want that hidden and
i want this visible right so if they click on here but the tax summary is visible this section is not
visible we need to make sure that this section is visible by hiding the summary so we're going to
run the macro called tax summary hide so that's all we're going to do in here so i'm going to copy
that here then hide so run macro to hide summary and we'll call this show doc info all right so
that's kind of important just to make sure all right so once we have that what i'm going to do is
i'm going to turn off screen updating application making it faster just in case dot screen updating
equals false and make sure to turn on it's probably not necessary because we've already
marked it uh false already so just in case and then turning on to true but probably not necessary
i think i'm going to remove it because we i think it's not necessary because we've already done it
on here right we've already turned it off on here we're already turning it off and we're showing the
preview right so before we set this to true we're already running it there's no need to do it twice
so it's probably not necessary good to go we can get rid of that one line so what i want to do is
i want to set that file tip i want to know what the file type is that file type is very important
if it's a picture we need to do something but if it's a pdf if it's a word if it's excel we need
to do something else so we need to determine what the file type is so how are we going to do
that well i'm going to use the last basically three or four digits of that right that path is
very important is it dot jpg if it's jpg or png or gif then we know it's a picture otherwise
it's some other document type so we're going to set that file type we're going to use the right
command and i'm going to use the file path of that and i also want to determine the length i want to
know the last digits the length of the file path right i want to get the right part of it so the
right length of the file path minus what i want to do is i want to find that dot right where
is that period but i don't want the first in case that name contains periods i want to use the
last one so how do we find the last one we can use in string reverse reverse for that what that's
going to do is going to find the last character file path and what character am i looking for
i'm looking for that period so it's going to find the last one of that so what that's going
to do is going to get us the extension get file extension once we have that we can determine what
document type it is let's add that quote in there that's important so once we have that right we we
can determine then what we'll want to do is based on that file type we can use the select case
so select select case is a great feature here case and what type of cases that we're going to
use based on that file type file type now if that file type is a picture case is equal to right
let's say png or maybe it is jpg let's see jpg so these are for picture file types or maybe it's
gif it's all gif or maybe it is a bm or jpeg right we'll choose jpeg because on a picture type we
want to do something else jpeg or otherwise maybe it's a bmp right let's do i'm only focused on you
could probably add a lot more than this but i'll add some bmp and lastly we'll do jpg right with
jp we did that jpg i think that's or tiff let's do tiff ti ff okay good so if it's those types
we know it's a picture type so let's just add in a comment here called picture type in a picture
type i want to do something else what do i want to do i want to insert a picture so dot pictures dot
insert and what am i inserting well i'm inserting the file path file path dotnet i want to set a
name to that so dot name is going to be equal to doc preview so that's only if it's picture what
if it's anything else case else if it's anything else i want to do something else i want to insert
an object right so here we're going to do dot ole objects and i want to add an object okay what
type of object do i want to add i want to add based on the file name so that file name is going
to be equal to the file path and i also want to have the link is going to be equal to false right
there's going to be no link false right and i want to display as an icon and also false display as
icon equal to false i want to give it a specific name that name is going to be exactly equal to
the one we have equals the document preview very good i like that good so that's the only different
thing we need to do everything else is going to be the same setting the position setting the height
regardless if it's a picture or an object right an object can be a word could be excel could be
pdf lots of things work well so now we can focus directly on that shape regardless of what it is
so we're going to do that with dot shapes because we've given it the same name we can focus just on
that doc preview and what do we want to do with it well the first thing what i want to do is i
want to lock the aspect ratio it's going to be true that's really important because i want
to make sure that it doesn't get contorted okay so now what i want to do is i want to set
some maximum widths and some maximum height so if dot width because i don't want it too big
is greater than let's just say 47470 then dot width equals four seven zero it's just going
to set the maximum width equals four seven zero i also want to do the same thing for the height if
dot height it's let's use something larger because we have a larger 700 pixels vertically then dot
height is equal to 700 let's call this set max width and we're going to set the max height set
max very good so now we set the both now i want to set the left position the left position where
we want to place let's take a look here i'm going to place it somewhere right around p4 let's
take a look right about here right about p4 is where i want to set it so let's set that left
position based on p4 so the left is equal to and again we need to call out the sheet in this case
income taxes we're inside another with dot range p for the left position of that dot left set left
position now all we have to do is just set the height set the top position dot top is going to be
equal to again we can just copy this we've already done it we're going to set the top position based
on p4 that's it and paste it in there and set that top position set top position okay very good
that's end width we need to make sure that uh everything else is set we're going to close those
spaces up we are good to go on that i like that and then all right i like that saving our work
again always before preview now remember this macro is set to automatically run if there's any
issues we'll find out real quick and we'll take a look all right we're good all right let's
take a look oops put this in the wrong area wrong this is in the wrong so we want this in
preview there's one i want to drag it right here preview right browse for document folder is
something different so we want to put it in the preview there we go all right let's take a
look at this see if there's any issues all right that's looking pretty pretty good it shows nice
let's take a look at this shows that right where we want it it's looking really nice i like that
we gonna we need some more spacing here because we're gonna bring that over so let's bring that
over okay that's looking pretty good it shows pictures it shows different things i like it
it's looking really good okay continuing on what else do we have want to make sure that we put
everything in here making sure okay let's take a look at that bug making sure all right let's
change this to true for word documents we need to update that there we go okay continuing on so
this is a word document let's take a look at that ah that looks nice okay word documents msoc
true didn't work true works just fine for both that's gonna be good all right looking very very
lovely now we've got documents loaded we do need to browse for the file we need to do two browse i
need to browse for the specific file i also need to browse for the specific folder here so let's
add in those macros here okay so now we got the macro in the document preview browse for document
folder browser document file those are remaining we've done everything else up to them we'll go and
try to go in order now and we have save and update but i want to make sure that it flows properly
so folder and file are two good ones let's add those in right now so for the document folder all
we need to do is just set some information up so we're going to do that right now so browsing
for the folder once we do that oh we're going to dimension the document right first of all i
want to dimension this just so you can see how it's done here document i want to make sure
that makes document folder is different than the named range remember just keep this in mind
make sure that they're different because that can create issues remember we have a specific
name range called document folder i want to make sure that we're using a different variable
and not document folder so we're going to use document and then we'll just use something called
folder as file dialog so now what i want to do is i want to set this document folder equal to so i'm
going to copy that and we're going to set it what type of it it's going to be a set document file
and then it's going to be equal to application dot file dialog and what type of file dialog
do we want we want of course a folder picker right in this case we're searching for
a folder browse for the document folder that's the one we want so that's going to be
folder picker and now we're going to figure some with with that specific one we created with
the documents folder what do we want to do well the first thing i want to do is give it a title so
i'm going to title is going to be equal to browse for document folder and then also what i want
to do is i want to allow multi-select and that's going to be equal to false right we only want them
to select one folder and then if dot show right does not equal negative 1 negative 1 is going to
be meaning they've selected someone then go to no selection and that's just basically going to
drop it down below that so that there's no issues no selection and then we're going to drop call
this called no selection then go to no selection okay so what if they have selected something
inside the admin dot range i want to put it right there and it's going to be we can put it in
let's say c3 i believe it's going to go into c3 is the range it's going into so that's where
we're going to place it c3 exit out of there c3 dot value equals dot selected items one so it's
the single selected item and that's going to put that full file path of that folder in there and
that's it that's all we have to do now let's go ahead and check for that and make sure that we
are browsing for the correct documents folder and this particular folder is where everything's
going to go so i'm going to copy this and i'm going to make sure that that's attached to this
browse folder so i'm going to put it to the entire button set signing that macro pasting that in
clicking ok now when we browse for it we can see that we've browsed for it okay that looks really
good we're going to set that document folder up to setting it up to here our documents folder
where everything's going to go and clicking ok all right i like that that's looking good now
what i want to do is browse for the file the macro that's going to actually browse for that file so
once i browse for that file i want to copy that and put it in the associated folder so what we
want to do is give the user the opportunity to browse for any specific file and then what
we can do is we're going to copy that into whatever year they've selected so we certainly
want to make sure that they have a year so dimension right the doc file as a file dialog okay
now with the income tax income tax i want to make sure that they have a year without having year you
know we can't put it into any associated folder so if all right let's take a look at what year
right take a look inside i want to make sure that j for contains a year right we cannot we
want to put the documents into individual year folders just as you saw without a year then we
don't know where to put it so we want to make sure that j4 contains a value or let the user
know if dollar range j4 value equals empty then message box let the user know please add a let's
call it tax year before adding any documents that way we know what folder to copy it into documents
okay that's pretty good and then exiting the sub without a year can't do anything else assuming
that we have a year let's put that into a variable tax year simply equal to whatever is inside j4
and that's going to set up our tax year inside a variable it's going to be a string variable it's
a number but we're going to use it as a string tax year obviously self evident continuing on
what i want to do is i want to check for the accurate document folder right if we don't have
a correct folder or there's some issue with this like when you get this file i want to make sure
that let the user know hey you got to get a get a proper document folder before we can continue
forward so we're going to check that for now so we can do that the first thing let's put this comment
check for accurate document folder so we're going to set that into a variable called the doc folder
is going to be equal to admin dot range and then also we have a named range which we can use here
right document folder that's our named range that we've already set dot value and i also would like
to add the backslash onto that so so we're going to use the and then we'll set the backslash
on to that so that we can do that backslash onto that okay because we're going to need that
and it's going to be called that document folder obviously continuing on what i want to do is i
want to make sure the accuracy of that so let's do this if the directory checking that doc folder
dot vb directory equals empty or we can check the admin now admin dot range this one document
folder if that's empty as well document folder dot value equals empty then let these know
you can use empty or double quotes they will both work just fine then let's use a no
message box please set a document folder okay so we have one right we're browsing for
the document folder so we can do that right up here document folder we can just prompt the user
to browse for the document folder at that point right so we can continue on so letting them run
the macro run macro to browse for doc folder okay good now i'm going to run one more test right if
it's still empty then we're going to exit out of the sub so i'm going to copy this after that point
and then we're going to run if if right either one of these conditions are empty then exit sub
right giving them that second chance but if then still empty then continuing on okay so assuming
that they've passed all those texts now what i'd like to do is i want to set the document file
right this one document file so set document file and it's going to be equal to the application
dot file dialog right and this one's going to be a file picker so this one we're going to look for
file picker i want to do a specific file picker so now with the document file we're going to do
something we want to do a few things first thing what i want to do is give it a title right so
the title is going to be equal to let the user know browse for document file so now that they
have the a proper title that they can go on to i want to add additional information right i'm
going to let them know they can select any type of file anytime there's no filter onto it so
we're just going to add this kind of filter filters dot add in this case right i
just want to put in select file select file and then a comma and then what kind of
file can they select any type of a file so i'm going to use the asterisk here and which
is the wild card and then i'm going to use the period and then we're going to use the asterisk
one more time meaning it can start with anything and end with anything and then i'll just do one
right so that's the position one is the position and then allow multi-select in this case no equals
false right they're not allowed to multi-select and then again we'll make sure that
they've selected something if dot show does not equal negative one would be
meaning they have selected something negative one then go to no selection just as we did above right
next look and then going no creating an outfit no selection and then adding a colon onto there okay
but if they have selected something what do i want to do well i want to do a few things right
i want to set that file path into a variable and i also want to set the file name so the
file path is equal to dot selection select item 1 that means the full file path full file
path i also want to set the file name what is the name of that file it's going to be equal to
the directory of that file path equal directory of that this file path so we're going to set
this is the file name here okay that is the file name so we've got both because i want to set
why is that important because i want to set the default file name i want to place that directly
in here and then they can change it to con and the full file path is going to go here but what i
want to do from wherever its current location is i want to copy that into the proper folder right
now no selection if they haven't selected anything we can't continue so we can exit out of that so
everything's going to be written down in here okay so the first thing what i want to do
is we've checked that i want to make sure to check to see about that file pal so let's
update that file path it's actually going to be more than that that file path is not just
that right it's more than that if i want to set a different file path so let's go ahead and take a
look at that i know that sounded kind of confusing it was for me too if the file path so here's what
i want to check now you're browsing you're pulling it from a folder but what if you're pulling it
from the same folder that you actually want to put it in if it's already in the right place then
we don't need then we don't need to copy it over so i want to check for that so let's do that if
the file path is equal to right dot selected items one that means the current file path then go to
let's just put in correct folder it's already in the correct folder so we can skip all that
in correct we can skip copy it over folder okay so we don't need to copy that if it's
already in the place we wanted to put it okay so that's good enough so we're good so let's
go ahead and set that new file path i want to put that new file path and i want to put it in
something else but before we do that i want to update the file path i'm going to be not only do
i want it on that i want to select it up so let's switch these i'm going to put the file name first
and then what i'm going to do is i'm going to update that file path based on the text year so
that file path is going to equal to the document folder okay and i want to put the tax year in
the tax year right because i want to put each individual has to have that tax here and i want
to put in the backslash onto that so there that's going to be that full file path so that let's do
that backslash here right and i want to make sure that we're putting in that file name right and the
file name that'll be it okay so that's that's our full file path of our destination let's put that
in here let's add that in destination file path destination file path okay so it's our document
folder our tax year and our file name that's where we want it to go to right we've already added the
backslash onto this up here right we've already added that up here so we don't need that error
so the document equals the texture and the file name and don't forget the and file name okay so
we've got our file path set already now what we want to do is we already now here we've got our
new file path equal to our existing file path if they're the same that i like that better okay
so that looks correct now what i want to do is i want to make sure that it to see does do we have
a folder for this tax year or not right if not i need to create that folder just to make sure so we
can do that with this if the directory of the doc folder and the tax year vb director i just
want to see if that folder exists or not equals empty that means that that means that
that tax year folder doesn't exist there's no folder right in this case let's take a look at
this here we have our tax manager our documents here there's no i want a individual 2018.
I want
those folders i want those i need to know does it exist or not so we can do that if it doesn't
equaling empty then we can make the directory then make the directory and what directory do
we want to make simply this right here which is the document folder and the document
that's going to add that year folder onto that so there we go so what that's going to do is going
to create folder if needed for the year all right good so we've created the folder just to make sure
that that exists and now what we can do is we want to make sure that we are know does the file exist
in the folder or not if we're copying a file from one location to another location it's going to
create an issue if that file exists already in the folder so we need to check that so let's do
that right now if the directory file path dot vb directory does not equal empty then we need
to remove it maybe we're making an update then kill the file path so that's going to delete if
exists now here's the important thing this is why we're skipping this right if that file name
if we're pulling it from the same file that's why we're skipping it's already in the correct
folder so we're skipping this delete so that's very important distinction now if it is not now
after we kill it after we delete it if it exists now we're ready to copy the file from wherever
the user has browsed for it into the new folder so we're ready for that so we can just file copy
for that file copy and then we're going to just all we need is the source now that sources course
is the selected items one that's the source and our destination is simply file path very simply
and that's going to simply copy the file to the new path okay good so we've taken into every
consideration all right now that we have that all we need to do is update j8 with the full file
path right j8 is going to can take on that so income tax and then actually we can do income tax
here dot range j8 dot value equals again file path okay set new file path i also want to do k10 i
also again as i mentioned before i also want to put that file name the default file name located
right here in k10 so we're going to do that right now so i'm just going to copy this and then
update this to the specific range which is k10 k10 and that's going to take on that variable
that we've already added called the file name file name is going to be that okay we can also the
directory of the file path we set it up now we got the file name file name good i like that set file
name all right now we have that so what i want to do now is that we've browsed for that what i want
to do is run the macro automatically so document preview right once we've added that file that's
why i had that let's see if it's slow application screen updating turning it false and off and on
but i think it's going to be fine so now what i want to do is i want to preview that document
run macro to preview document good and then if there's no selection of course they haven't
selected anything yet end with and there we go and sub now we can add that end with up there so
we need that that's sufficient up there all right no selection and within sub i think that's perfect
this is the width for that specific document file this is the width for that sheet income tax
sheet probably don't need to so as long as so if you see how it says income tax here if i
put that down here before the end with right if i bring that down here won't matter too much
right between the end with right we're done with selection but keep in mind no selection has
to be after right if they've made no selection we need to add that after and put that right here
meaning no selection all right good so let's take a look at that so now we're within the income tax
sheet so i can remove this here just in case it's not necessary to have the sheet there because
we're inside the width we're no longer in the width of the specific document file here all
right we've added that up all right so let's take a look at that saving our work before we run
that macro now what we're going to do is we're going to browse for that macro it is this macro
browse for file dialog that i'm going to attach to that button that we have created right here and
we grip it so i want to add hold down the control on both the icon and the button right clicking
it adding that macro pasting that macro in here and then we'll check for any issues and fix
them accordingly browsing for that macro now we can browse for a file we can use any file i
can use even use an existing one which is fine and we have a form here a png form clicking ok
all right and it browse for that it looked like it found it good and and it put the file name
here let's add one more all right we're going to add one more here just to make sure that we can
change it browsing for it here clicking ok making sure that it changes all right that looks really
good it's changed it it's added that in here it's put in that new file inside the year right
giving it a specific name putting that name here all right we are looking really good of course we
can add an amount onto that right if we want to now what i'd like to do is now we've added all the
information now we've previewed it accordingly but we need to save this document right i need to make
sure that that is either saved or updated right if it's going to be saved if it's if it's saved it's
a new one how do we know if it's a new document or not well we can look right here the document
row we know if the document id is gone from this we know that document row is going to be empty we
know it's a new one however it's an existing one we know there's a row associated so it is
the macro that's going to allow us to save it and that's the macro that we're going to go
all the way up here save and update right here that's the macro that i want to write now with
you so we can show that how we actually save and update that okay so the first thing what
we want to do is i want to make sure that we have the required field so with income tax
i'm going to check on those required fields one of course is a year and we also want to
make sure that we have a type those are really important so i'm going to look for j4 and
n4 we need to make sure that we have a year we need to make sure that we have a type so
both of those are required so if dot range j4 value does not equal equals empty or dot range
and four equals empty in either one of those cases let the user note equals empty then let the
user know with the message box that those fields are required okay we'll just call it tax year and
we have the other one of course uh let's see what are we calling that transaction type are required
exiting the sub we can't move on unless we have this okay continuing on now that we know that we
have those we can set that tax here that tax year is already variable we created and that's going to
be based on whatever's in j4 so we can copy that and then make sure we put equals and paid that's
the tax year once i've got the tax i also want the document name what is that document name it's
going to be located inside k10 remember k10 is going to take on our document name document
name so good now that we have our document name attached here now what i want to do is i want to
determine is it a new document or not remember we just discussed it i need to know that and it's
going to be based directly on what is located in b5 if b5 is empty we know it's a new one so if dot
range b5 dot value equals empty then new document and then end if else existing document so what
are we going to do if it's a new document if it's a new document i want to do a few things i'm
going to set that document row it's going to be the first available row right so we need to set
that document row it's going to be equal based on the database the tax document database dot range a
99999 and xlr dot row plus one the first available row first available row i also want to set that up
make sure that next document id now we've already know that next document date we're using the max
formula so i'm going to take that next document id i'm going to place it directly in b4 and i'm
also going to place it in the first available column right here and this b32 and column a so
i'm going to do those two things with the next document id so the first thing running dot range
b4 is going to be equal to whatever is located in side b6 is where it set the next available id so
dot range b6 okay so that's going to take on there 6 is going to be our next dot value next id okay
also i also want to take it and place it in in the column right so i want to put it directly
inside here a and that brand new row the tags document right here so a and the document
row dot value is going to equal whatever's also in side b4 that we just placed in there
okay so we can place that right in there that's also going to place that next id that's great so
we've also placed it and also what i want to do is i want to place a document row we may need that
in the future right that's kind of important so i want to place the formula here in row so that
could be important so i'm going to place that formula directly inside here okay so let's that's
going to go in column j so column date tax doc database dot range i don't think we're using
it in this training but we might in the future doc row dot value equals that formula
right that formula is right there set row formula okay that's all we need to do if
it's a brand new one but if it's an existing all we need to do is set the document row and that's
going to be based directly on whatever's in b5 so that document row is equal to whatever is in b5
document row so now that we have that now what we can do is regardless if it is a new or an existing
we're going to run a loop using data mapping for the data let's call it doc column just as we did
more loading it equals two to nine two two nine and then we're going to close our loop next doc
column i'll move that up okay so we have our loop here and inside that loop we're going to basically
do the reverse right if we remember we look down on here on the loading dock let's take a look in
here the loading we did something very similar so i'm going to copy that and just do the reverse
of that so i'm going to copy that i'm going to bring it right up here into the save right here
and that's where we're going to place it right here so i'm going to paste that in here but now
we're doing the actual opposite we're taking whatever is in the range and we're placing it
inside the database so moving our equals over here so now whatever's in inside this range here we're
placing it inside the database so that's going to save data so basically the opposite very very
easy to program okay good so we've got that we've placed all the database now what i want to
do is i want to once i have updated this right i want to make sure let's say we added a brand new
let's say we added a brand new year right let's say we we put in 2023 right that year doesn't
look so i want to run the macro that's going to automatically load these tax years again but i
want to set that into a variable because i want to know what year was selected and i want to make
sure that that year's continue to be selected so the best way to do that is simply to put those in
two variables okay so we've already got the tax year and the doctor name into variables here
that's going to really help us going forward okay so how do we do that so the best thing to
do now is set the tax year so first i'm going to run the macro that's going to load in those
tax shares right i want to do that right in here let's load that macro where did it go tax years
here top list so i'm going to run the macro and then i'm going to place that drawn under
save so so we're going to let's say refresh year list and now what i want to do is i want
to i want to set the row right if i've just refreshed the list right if i've refreshed that
list we don't know what row we don't know what row selected i want to look for the year that
tax year if it's found on on let's say 7 i want to take that 7 i want to place it directly
inside b2 if it's found so here's how we're going to do that first thing what we're going
to do is we're going to go to on air resume next and then what we're going to do is i'm going
to set something just like that dot range b2 is what i want to set b2 dot value is equal to
what the row of which it's found on i'm going to look for that row how do i know where it is so
we can do this dotted range d5 that's the year list d5 through d let's just use a larger own
nine nine nine dot what i want to look for i want to find it i want to find that tax here find
what am i looking for i'm looking for the tax year i'm looking to excel values and excel whole and i
want to return the row i want to know the set year row and i want to place whatever year it's found i
want to place that directly into b2 i also want to do the same thing for the documents right i want
to set the same thing and then we can do on just in case it's not found it could re there so that's
why we're wrapping it on our resume next in on our go to zero okay great so now that we have that i
want to make sure that it's not empty so if doll range b2 is not equal empty b2 dot value does not
equal empty then what i want to do is i'm going to set that document make sure that we've selected
the right document i'll look for that document and find it dot range here it's not equal empty then
it's called on accurate selected you're accurate selected yeah it's gonna be a long training and
if they're all long this one's gonna be longer than normal so let's take a look at that so now
what i wanna do is i wanna refresh the document list right we just created a brand new document
or saved it maybe we updated the name maybe we don't know what we did but what i want to do is
i'm going to find it in this list and i want to make sure that it's the correct selected row so
what i want to do is i'm going to refresh this list if i've just changed the name this list must
be refreshed right so we're going to run the macro that refreshed that list right the document thrust
list it is this documents list load so i want to run this macro to refresh the list of documents
now okay so we're going to run the macro run macro to refresh documents okay good so now but now
we also need to set what row right if i've just deleted that we don't know what row that row also
needs to be set in b3 right set that selected row so again we can do that just like we did before on
a resume next and on air go to zero right wrapping that in in case it's not found i'm going to look
for it i'm going to place that row in b3 dot range b3 dot value equals what i'm going to look
for that it's going to look for in a specific range so what range is that dot range here f
it's going to be looked at document name i'm looking for that in column f5 through f in the
larger or 999 dot find what am i looking for i'm looking for that document name document name
and i'm looking at excel values and excel whole good so i like that and i want to extract the
row from that set selected document row okay very good i like that and now what we're going to
do is we've saved the document i'm going to run this little macro is going to do a saved message
we need a shape called document save message i forgot to create that but it's no problem let's do
it right now i want a little save message that's going to go up here so i think all we'll do is
just duplicate i'm gonna copy this shape paste it here not the text and copy this shape here paste
it here that way it's got the same size and we're gonna call this document save document saved we're
going to send to that and give it a specific color here center that and then give it a little bit
different uh probably 1.4 okay and then i'll give it a nice color shape fill something different
right let's do this here and then give it the uh let's a different font color okay good i like
that let's do that and then do this here giving it that text perfect okay i like that okay so now
we've got document saved so again i'm going to go back and copy this to make sure i've got copying
the name of this message going back in here i'm going to assign it that name okay now what i
want to do is when the document's saved i want this message to fade out we've given it a name we
know it's document saved it's purposely giving it a different color i like that so this is basically
going to fade out this we've been over this before but i want to run this macro when it's saved
i'm going to copy this and paste it down here run fade out message macro very good as long as my
voice is still with us all right i'm here for you guys okay so it is that macro that we just created
that we are going to assign to that button so all i need to do is just copy this check for any
errors of course we save before we run the macros assign that to both the button holding down the
control both the button and the icon assigning that to the macro down here assigning that
don't need that part no not that part just the macro itself good i like that saving our work
before running and then we're going to click save okay and we're going to check it out see
now our document save message is fading out that looks good okay so it faded out it saved
everything very good and let's make sure it's saved let's just do this test notes here saving
the document here we need to have some borders around there going back out of it back into it to
make sure it's saved it did i don't know i think we need a border around here don't we look better
with a little bit of a border i think and then we can put that border around it not there there and
there okay it looks good to me like it all right looking really good it's saving properly i like it
we have to add this new document delete document view tag summary all right let's do that those are
relatively easy macros let's get those written up now and we'll go down here we've almost done with
this little module here document new relatively easy so let's get that done again all i'm going
to do is i'm just going to copy that range here we're going to work with our specific thing all
i need to do is we've already done it here i'm going to add one thing here so with income tax
okay i'm going to paste everything out i want to add one more thing to this clear content range
and that means i want to add whatever document id is located in b4 i want to clear that out too
so b4 i also want to make sure that of course we are deleting any type of preview that might be
here so i'm going to copy that and paste that up directly in here so that's going to be for the new
one okay so what else do we have on the new it's relatively simple maybe all we want to do is just
prompt the user to select for year so dot range j4 i'm going to have them select that's the year
select okay i like that that is the macro that's all we have to do we're going to assign that
macro here to that new button there okay moving in and then this document here so holding down
the control and then what we're going to do is assigning that macro way up here we don't
need it there pasting that in clicking ok so again always saving our work especially when
we use clear contents right saving your work before running a macro clicking new everything
looks good everything got cleared out let's add something we need to add a tax here notice we have
that i've got a named range formulas name manager right we've got something called tax years here
that's the one that's going to be a named range on our tax years that's sufficient we can add that to
a drop down list so data validation right adding that data validation right here and we're going
to use a list and we'll call that tax years okay equals don't forget the equals equals tax years
okay i like that now we have a drop down list of tax years we can add to it we have a transaction
type let's do an expense we have a 1099e we can browse for a particular document anything is going
to work for us at this point giving it a name it displays properly fretters and giving it a mount
okay i like that let's contest notes making sure that we're adding that okay saving that document
it assigned it that row the id the row looking in our database all the way down here everything
got added in the save is working quite nicely that's looking good and make sure that it got
added in the right folder let's look in here what folder was that we just added in 2021 folder
so let's take a look inside the folder that got added in accordingly taking a look two zero two
on 1099 form period this dot i got it in the right folder okay that's looking really really good
all right new document now let's go to the macro that's going to delete the document this one's
very very easy so let's scroll down here deleting the document very very easy so what do we want to
do first i want to give the user a prompt to make sure that they wanted to do that so we can do that
message i think i got that on auto hotkey to make it faster there we go are you sure you want to
delete this not appointment document that's auto hotkey it's a free software you can download
it that makes things a lot quicker otherwise it'll take six hours instead of three so let's see
continuing on now that we know that they've wanted to delete it what we want to do is with income
tax focus on that sheet if i need to determine has it been saved or not right maybe they want
to delete it and has them and save which is fine so how do we know if it's been saved of course we
always use b5 it's going to let us know if b5 is empty we know it hasn't been saved if dot range
b5 dot value equals empty then we need to skip go to not saved and that's going to drop it down
here not saved and then all we need to do is just simply run the macro to add new beyond that
so that's going to be relatively easy so what if it has been saved if it hasn't saved i need to
extract that row document row is going to be equal to whatever's in v5 extracting that inside
a variable okay document row because this is that row that we're going to have to delete inside our
document database so we can do that with the tax document database dot range document row and okay
adding that colon there and the document row dot entire row not column row dot delete okay that's
what we always saved before just in case deleting that row okay so we're going to delete the row and
then that's it that's all we have to do then what i want to do is simply run the macro that's going
to add the row right delete let's put this delete database row okay so now that we have that so now
all we need to do to clear out the contents of this is simply run this macro here now we're going
to run this macro regardless if it's been saved or not so we're going to do here run macro to add
new okay so that's going to be all we need to do is pretty much easy okay good enough okay then
there we go all right good so i like that and then we can save that work always save and then
assign that document delete macro to the button that we previously created so going in here delete
document here selecting here and here right click and then assign the macro pasting that in there
clicking ok ok so that one we just created here delete the document are you sure you want to
delete the document no good that works fine delete the document again are you sure you want
to delete it yes okay it's going to delete the document actually what we need to do is refresh
this list right we really need to refresh that list let's do that now i like that so one more
thing to do and that's refresh that document list kind of important right so let's go up here
scrolling up here and look for that macro right here document list here that's the macro that
i want to run on delete kind of important there so going down here right and then document
delete here let's call this that's a reload document list okay good let's try it one more
time make sure that that list gets updated here delete the document yes let's put in yes and good
now we've got the list refreshed i like it perfect that way we don't have any issues all right it's
looking really good i like that now what i want to do is i want to be able to what if we want to
print that document all right well we're going to print the summary that's going to be it for all
the documents we don't need anything else on here that's sufficient enough all right document delete
so we've covered so far we're almost done we've covered save document delete view tax summary
now we're going to focus on the tax summary so what do i want to do when view summaries
click i want to hide everything we have here and i want to show this tax information all
right so let's continue inside the module for tax summary it is these modules that we're going to
go into now so we've got show and hide so that's what we're going to work on here so what do we
want to do when i show it well when i show it i want to show a few things okay so we're going to
focus again on with income tax inside that sheet what i want to do is i want to make sure that
we're deleting any document preview we don't need to show the document preview so if there doesn't
exist of course it would do dot shapes doc preview right when i'm showing the summary we can delete
the preview of the document dot delete okay delete doc preview we can always recreate it just by
selecting it again so it's no problem preview okay so and then on air resume next okay so now
that we have that what i want to do is i want to show and hide certain shapes accordingly
right so when i want to show that tax summary right we want to show the tax summary what do
we want to do i want to hide this group this group here should be hidden because this is all
associated with the documents so it's called the document group that's the one i want to hide
so that's what we're going to do first dot shapes this one here document group dot visible
equals mso false right hide the document group hide document group but i also want to show the
summary of europe so dot shapes and what is that summary group what is the name that we assigned
to that right if we scroll over here we've got three different buttons here and we've got let's
uh reset that so it's going to show that here and didn't we sign it and let's call that make
sure that we assign that a name for that i think i may not have gotten to that there it is tax
summary group that's the name we assorted with those three buttons that's the one we want to
show visible so it is that one summary dot visible equalism is so true so show summary group so
once i want to show i also want to basically show there's going to be a chart that's put in there
i want to make sure that we add a chart we'll add in that later so i'm going to show and hide that
chart we'll be creating that soon give that a name but also what i want to do is i want to hide
certain columns which columns do i want to hide well i'm going to hide let's say i through
z right all these columns here associated here let's say i through z i want to hide those
columns so dot range and then i through z entire column dot hidden entire column dot
hidden equals true right want to hide all of those columns okay so now we got the entire
columns hidden true and now what i want to do is i want to show the other columns which columns
do i want to actually show the summary columns those summary columns are a a through a e i want
to show these columns okay so we can do dot range and then it's called a a through a e those
are the columns so i want to hit it dot entire column dot hidden equals false okay so we
want to show those right by and that's it that's all we have to do okay so the rest is basically
just the opposite so i'm going to copy this here and then just switch them around for hiding right
when we when i want to hide that summary i want to do exactly the opposite right this is probably
not necessary here we don't need that part here document group of course we're going to show
that right so i'm going to do msoc true and then comment show the document group then this is going
to be false right we want to hide the summary false hide the summary group then i'm going to
switch these true and false so this is going to go to false and this is going to go to true then
all we need to do is assign those buttons to the buttons that we've created i like that that's
look really good so the show one tax summary show that's going to go on our first button that's
located right here on the left side here view tax summary so i'm holding down the control right
click clicking n that's going to paste that in and then tax summary show that's the macro that i want
to see again saving our work for running macros view tax summary good that's why we don't have any
data in here text but in a hide summary i want of course i want to do that of course and we can also
search for that macro here tax summary hide is the one we want to do there and then hiding the tax
summary okay i like that there you see all we need to do again is select that to show it perfect okay
that looks really good so now what we want to do is i want to run a macro that's going to actually
refresh the data that's a very easy macro of course it's going to be based on the selected year
i want all those transactions for the selected year to appear here okay and that happens to be
the next macro that we're going to write called tax summary refresh and the first thing
what i want to do is i want to clear out any data that might be in here so from aa9 through
ae i want to clear all that data on so income let's focus on that income tax dot range aa9
through a through a e and a large row student999 and then dot clear contents right we want to
clear all the clear any existing transactions okay so we've cleared all that out now we're going
to really focus on our tax document with tax doc database right because that's where we're
going to run our advanced filter to get that so again first of all we're going to get the last row
i need to know the last row data just as we did before if the last row is less than then of course
four then we need to get out so we use four right nothing else we can do if there's no data assuming
that there is data we can run our advanced filter just as we always this advanced filter is going
to go all the way starting in row three right our data starts on row three and it goes all the way
to column j so j in the last row okay we want to run our our criteria now our criteria is going to
be based on that year we already went over that year here we know that that year is our criteria
here our tax criteria is right here based on that indirect formula so our criteria is going to be
o2 through o3 and where do we want the results come i want the results to come here some results
that i've already set up here so o2 through o3 and then our result is going to come from u2
through z2 okay so let's set up that up here o2 through o3 and then the results of course are
in u2 through z2 u2 through z2 now we need to determine the last row the results so the last
results row of course is going to be equal to range of course not going to base it on column u
not a so the last results row if the last results are less than three then there's no data so
last resorts are less than three then exit the sub assuming that there is then all we
need to do is bring over that data so income tax dollar range aa9 through ae and
the last result row now of course our our data that we're destinations is going to
start on row nine our original data is going to start in row three so we need to compensate for
that by adding six dot value is equal to dot range u three that's our first row of the results all
the way through y remember going to bring y why is that because i actually i don't want to bring
the rows what i was thinking is that we might need the path we really don't need the path so i just
going to bring it over to y y is the last amount that's sufficient enough we really didn't need to
bring the document path over but if we needed to loop through the documents for any reason we could
so amount y is going to be the last column that's sufficient so y and the last results row and the
last result row good so that's going to bring over all the data over and let's of course saving our
work and when do we want this to run well i want this to run in a few different times right i want
to want this to run automatically when we're going to show the tax summary when we show that tax
summary i want this to run automatically so run macro to refresh data so every time we show that
it's going to refresh that data that's going to be nice that way we have it all the way over so let's
take a look at that and then see how that's going to work and so we're going to hide the summary
we're going to view the tax summary check out let's fix that bug aaa clear the contents one too
many zeros probably in there and then continuing on yep we forgot a row that's kind of important
right so there we go very important actually continuing on okay and that's why we save our
work all right okay so let's take a look we got our data in here that's looking good but now
what i want to do is i want to have some i want to know the total income the total credits so how
do we do well that's a relatively sum if so equals sum if right and what are we going to sum it on
i want to sum the range right what is our range here is going to be our transaction type
right so i'm going to go to a large row let's do 999 and it's going to be based on income
right so i want to know only those that are income and where's that sum range it's going to be this
amount here so using the same number of rows right we want to go to that and it's going to be 999
good so we've got the income that's going to be the sum if so we notice that we've got 45 000 now
what we want to do is do the same thing for credit so i can just simply copy that bring it down
here and change it to expenses so instead of income i only want to focus other is not going
to be affected so now expenses okay expense all right so now we've got our expense and of course
our total tax billing is simply our income minus our expenses and credits okay and now we have our
total taxable income perfect okay i like that all right that looks really good now let's go ahead
and put in a chart we'll print the summary zip and email very easy okay so let's get a chart in for
that and let's go ahead and add a chart into that this is the data that i really want to focus
on so what i'm going to do is i'm going to do insert right and we can do recommended charts
see what they recommend chart title this looks pretty good i like that so we can select this and
click ok we do need to do a few things with it of course i don't want a chart title and i don't want
these this rows here and we don't want these and um i'll put labels so we don't need that here and
uh good let's take a look at that shrink this down a little bit and we're going to update the data on
it so we're going to add some additional filters and some additional information i like the colors
but let's set a color there and let's scroll this up i'm going to set it set a color there i like
this color here let's go down with this color here that's good now i want to add some additional
information from that i want to add that we got the series okay but let's format the data in
here i want to format the plot area just fix it up a little bit so we can look at it and make
it look nice so let's add in let's take a look at not the plot area but the chart area i want to
add in some additional information here not not so much and inside the data series so i'm going to
select on the data series and i want to basically reduce that width right because we don't have a
lot of space so i think that's to be sufficient and that i'm going to bring it down here right
we only have a little bit of space to work with and we have very very limited so i'm going to
bring it down here and like right about here okay let's uh let's add a little bit more i want to
make it exactly the same and then we'll add some data labels on to that and then reduce that okay
that's looking good let's get rid of additional spacing here we don't need it and then we'll
also update that accordingly so we don't need the background here so we can no shape fill on that
no fill on that and then i'm going to update this i'm going to add and let's drop this down we'll be
using it a little bit more for this customization and then going into i'm going to add this give
it our green font bold and italic for that and we want to add some data labels onto it
so i'm going to add data labels onto that and then those labels we're going to get those
visible in just a second making also them the same color bolt italicized bringing those down
we don't need the extra spacing that's looking pretty good i'm going to move that and size
it up accordingly there and then we also don't need the extra there okay that's looking pretty
good all right we'll just size it up bring it a little bit bigger than we need to to make sure
we compass all the data ooh that looks quite nice all right good we've got a nice little chart
there and now i want to give this chart a title i want to make sure that we may not need to hide
it let's hide the summary and see if it looks okay that looks all right i like that it looks pretty
good and of course it could be it's good enough for our purposes so we've got a nice little chart
title there we're good enough to go on that let's print the summary and zip an email write those
two macros and then i'm going to let you go okay so the last things that we have to do
print that summary that's very very easy all we need to do is simply set our print range and
then all we need to do is just print it out so let's write that macro right now inside that
so we're going to set i've got the print range all the way up here as a string so we're good to
go on that and so we're going to set that print range is going to be equal to we need to set it
to the equals to the income taxes we don't know we need to set the last row.range and then we'll
do we'll set the title aa4 that's our first row that we want to print through a e and we just need
to get the last row and where's that last row and income tax dot range a let's use aa999 i want to
know the last row of the data dot end xlr dot row okay dot address okay so i want the address
of that that's gonna set print address into a string into string okay so once i have
it into a string i can then use the page setup so income tax dot page setup and then what are we
looking at i want to look at of course the print area is going to be equal to whatever's in the
print range so print range okay so now that we have that that's going to actually set the print
area set print area once we have that we can just print it out income tax dot rank dot print dot
print print out and what do we want to print out well i want to print out obviously from two all
the copies preview we don't need to preview it so we can do that active printer true we want to set
the active printer print to file now false let's do false on that we don't need to print a file
collate print a file name no ignore print areas and that's false we don't want to do that okay
so i like that that's going to do that now all we need to do of course is assign this macro to the
button that we've created so print summary is here and i'm going to hold down the control on those
two buttons let's make sure i've got those holding down the control here and here assigning the macro
here pasting that macro and clicking ok all right so printing that macro here it's going to print
it to the default printer mine's snagit so let's minimize that you can see that let's do that
bringing that down here all right that looks good it looks nice everything's printed the tax
summary for your ending we need to add that year ending that reminds me thanks for reminding so we
need to do that that year ending is important we need i've got a border around here i don't want
that so right format right shape outline and then no outline on that okay there we go and i don't
want it here also here so that that outline's got to go no outline all right that looks better
no outline on that so tax summaries so what again what i want to do we need to get that year
well how do we know that year well we have that year here we know a formula for that year here
right so we can just add it here and right we know using the indirect so we can just do that that's
going to set our year easy we've already said a year so going back into the income tax all we need
to do is use the word we've already had this on the equals which is what i want and right this if
error so that's going to set our year now we have the tax number now as we change our year here we
see that automatically our data is automatically updated we can increase this a little bit higher
there so we get all of our data encompassed i like that it's looking pretty good okay it looks really
nice so now as we remember i said as we select a different year we want that to refresh so we
already set that up in the selection change event looking really good print summary last thing is
i want to be able to take all these documents and i want to zip and email them and create an email
that's the last macro let's write that right now zip an email i already have dimensions to help us
move us along because it's already an incredible marathon training so let's see what else we want
to write inside that what we want to do is we want to make sure that we set that print range right
just as we did here i want to make sure that we're setting the privilege not only do i want to
zip an email i want to create this into a pdf i want to print this summary into a pdf and i want
to include this pdf inside the zip file as well so here's we're going to do first we're going
to set that print range just as we did before and also what we're going to be doing is setting
up that print just in case i'm going to set that print range just as we did before of course we're
not going to print it out we're going to actually create a pdf to do that so but we set the print
area we did those things those are important okay i also want to set the tax here i want to know
what is the selected tax year but i'm not sure what document's going to be selected so but i
do know based on a formula that that tax year is going to be right here inside o3 so i'm
going to set that into a variable so the tax year is going to be equal to whatever is in the
database here our tax doc database dot range 03 that's going to set our premiums whatever's
there i want to know what that is dot value okay it's going to be our pr our tax selected tax year
once i have that selected tax here i want to check that we have an accurate document folder very very
important now we did that already up here inside the documents just to make sure that we had it so
we can just copy that to make sure that we had it we did it right here right here to make sure that
the document folder is correct okay so up inside when we browse for the document file we wanted to
make sure that we had document folder right we're checking to make sure check for accurate document
folder i want to do the same thing inside so i'm going to copy that to make sure that we have the
document folder because that document folder is going to where we're going to be zipping it up so
we're going to paste that in here that's going to check for the acumen document folder it's not
letting the user browse for the correct folder okay so once we know we have a correct folder
i want to set the zip folder that's going to be a string variable the zip folder is going to
be equal to the document folder we've got the document folder make sure we've set it here admin
range document folder right making sure that we've set that up properly is going to be basically
our document folder plus our tax year and our tax year that's why the tax year is so important
and i want to add a backslash on to that okay so that's going to be our tax year okay that's going
to set the zip folder okay i want to know what folder we're going to be zipping very important up
all the documents in that folder must be zipped up okay now that we have that what i want to
do is i want to check to make sure that that to see if that tax document has been created i
want to make sure that we're we've got a correct folder there the year so if the directory okay
of the document folder and i also want to add the year on to that and the tax year obviously we
can't zip it up if it doesn't exist and backslash here vb directory i'm going to check to make
sure there so we can do just the text here that's sufficient enough right dot vb directory here is
equal to empty then we don't have any right we don't have any director then what did that in then
right we have no folder to do that there's no year we must have a year folder to zip up right there
must be documents inside that earphone message box let the user know there is no document no document
folder for the year of what what is that year and tax year and please add at least one document
right as soon as they add a document the year will be created that folder will be created
add at least one document to zip up and email no folder no files nothing to zip exit so very
good now what we want to do is i want to create that pdf what i want to do in a pdf is i want to
create a summary based on this basically i want to print all of this starting starting let's
say from a print this in a pdf create a pdf and also include that inside the zip file okay so
that's just what we're going to do right now we've already set the print so the pdf file is going to
be equal to right we're going to set the file path equal to the this is the string variable equal to
the doc folder and the tax year and the backslash and what and i want to set a name i want to set a
specific name for that tax year that's what i want to start out with and i'll do dash summary right
so i want to give it a name dot pdf that's going to give it a very specific name for that okay so
that's going to be called let's there we go and that's called tax summary pdf that's in a string
variable so that we can create it so once we have the accurate file path and the accurate file name
then we can create it okay we just want to make sure but if it already exists in the folder i
need to remove it if the same name exists so if we're going to check here if directory pdf file
dot let's make sure it's spelled right pdf file dot vb directory okay does not equal empty that
means it exists already and i need to kill that or remove it then kill and then the pdf file
so that's going to remove the file if it exists because if i can't recreate a new one with the
same name remove file if existing continuing on if i know that it's been cleared out now now we can
create it so how are we going to do that we can use income tax that's the sheet associated we've
already set the print range so that's good now what we're going to do is we're going to simply
export it as a fixed format and what format is it's going to be a pdf right and what is
that file name well the file name is the pdf file that's the file name we said quantity of
course we want to set that as to 1.
We don't need that that's not necessary and then what we
want to do is include document properties ignore print areas we want a false we want to include
the print area so we don't want to ignore from 2 and then open after publish i want to make sure it
falls i don't want that opening up that's that's sufficient for now so that's going to create that
pdf and put it in that specific file perfect so that's what we have it in the right place so once
we've created that i want to set the zip path what is that path of that zip folder we have the zip
folder but now i want to set the zip path so that it's going to be that actual zip file name it's
going to be equal to the doc folder and the tax year and right i want to give it a specific
name dash let's call it documents so we have the documents dot zip that's gonna give us a zip file
zip file name okay good so now we've got the zip file into a string and now we're ready to create
that okay so we create that now we've got some outlook applications i've got a shell application
we're going to create that as an object in late binding and we're going to create it right here so
we're going to set that shell app is going to be equal to we're going to create an object create
object and what type of object are we creating we're going to create a shell application this
is important for creating that zip file shell dot application so once we've done that we can
work with that we need to create an empty zip file that's first thing and then we fill it up
create empty zip files so the first thing to do with that is we're going to open that zip path so
we can do do it with this open first of all i want to make sure that it's empty so if the length
of the directory here the zip path making sure does not equal empty just in case it's not empty
does not equal zero then we're going to kill it right then kill just to make sure it doesn't exist
zip path i want to make sure that it doesn't exist okay just okay so now we're ready to open it so if
the length is greater than zero then kill it okay once we have done that then what i'm going to do
is open it so we're going to open the zip path for output as number one okay so it's going to open
it up then what i want to do is i want to print number one okay and this is kind of some i'm just
going to copy and paste this it's going to take a while i don't there's all these strings that help
us create the zip file kind of weird but making sure we get it accurate character 80 character 75
character five character six somebody will explain that to me one day close number one okay close
number one so basically all we're gonna do is opening it updating it printing it out and then
closing it okay so now we've created that empty zip file now what we want to do is we want to copy
and we want to compress the folder so copy here and compress files into the folder compress files
into folder okay so we're good to go so to do that again we're going to use that shell application
so set shell app is going to be equal to create object so we did that already so just to make sure
we've done that already that's sufficient we don't need that we can just bring that down here i'll
bring it right down here we're good to go on that and then paste that here okay so we can create
that there once that we've done that we've created that cell then what i want to do is i want to work
with it so how do we do that so the shell app dot namespace okay we're going to create the namespace
is the zip path zip pap that's the namespace of that dot items.count we need to determine how
many items in that folder we're going to zip up is going to be equal to the shell app we're going
to count those dot name space zip folder so inside the namespace zip folder dot items dot count so
based on how many items are in that folder adding that copy here making sure that we're copying it
we need to know where to copy okay great so now what we need to do is we need to need to make sure
that we're going to automatically do that until all the files are so we're going to know here keep
script waiting until compressing is done script waiting until compressing is done so
we can do on air resume next okay and in here we're going to use a do until due
until until when until the shell application is the counts are equal to account until we've done
with all the things so shell app dot name space and then again the zip path dot items dot count
until all the items are accounted for okay in the zip folder so i'm going to copy this here and i'm
just going to paste it there do until equals and of course we want to make sure instead of zip path
this is going to be the zip folder right until all of the items are accounted for inside the
folder there so until all the items so we're going to do that i'm going to loop through all of
that until that happens okay and then we'll do on air go to zero just in case there's an error all
right good so we've got that accounted for good okay so now we've created the application so of
course i'm going to save our work and now we've done so now once the zip is created we're ready
to create our email so we're going to email it so we're going to set the outlook app again using
another object equal to create object it's going to be the outlook dot application so once we've
created that outlook now what we want to do is we want to set the alek email the outlook email also
an object okay and that outlook email is going to be equal to here that alec app and then again it's
going to be dot create item it's going to create that email create item that's going to create the
specific email that we want to okay good set email equal to i'll equal don't forget the equal randy
okay once we have the equal there we're ready to go now we're ready to work with it so with the
outlook email we're going to work with that now we don't know who we're going to be sending it to
so we're just going to leave that blank 2 equals empty and that's going to set our email okay but
we also want to do attachments right so we want to specifically attach something so dot attachments
dot add what do we want to add i want to add that zip path zip path that's going to be now we're
going to set a subject subject we can set any subject we want really it's going to be equal to
let's call it tax summary for and then a space and tax year set subject and now what i want to do
is i want to set the body we can do anything with that body is going to be equal to i have attached
the tax summary for year ending let's do and the tax year okay keep it simple great and now what we
want to do is just display it i don't want to send that email i want to display display use dot send
to send right away so dot display that'll display it okay let's take a look at that of course saving
our work fixing any issues and we'll take a look at it this is the macro that we're going to
assign here right here so i'm going to copy this and assign that to the button here so this
the zip and email so holding down the control again assigning the macros here assign the macro
pasting that in here and clicking okay and now that we've got the macro sign we can select any
year and then we'll click zip and email and take a look at that and see let it compress okay that
looks really good we've got the our tax summary for your 2018.
Let's double click on our zip file
we'll open that up check for the documents inside all the documents associated are inside that zip
file that's really really nice okay it's looking really good all right let's take a quick review
in this particular training i showed you how to create a brand new list for tax years documents
associated within that tax year save update add new delete documents and to show a preview of
the document regardless whether it's picture pdf word excel or anything like that showing that
preview we also created this really cool view tax summary where we have this graph total income
credits and income and expenses and also of course lots of conditional formatting and display that
record and of course print it along with zip and email thank you very much for sticking with us on
this incredibly long but amazing training i really appreciate your continued support don't forget
you can support us on lots of platforms including patreon where you get additional features fixes or
focus along with pdf downloads advanced copies of the applications you'll even get downloadable
videos and of course we have our 200 workbook zip file for just 77 and now it comes with
the optional pdf code books inside there so i've even got that go ahead and check that out
using the links down below thanks so much don't forget to subscribe like and share this video
and we'll see you next week thank you so much you